Tuesday 22 February 2022

New AI Mesh Not as "I" as I'd Like

I haven't actually added them all up but I suspect I've reviewed more D-Link devices over the years than those of any other manufacturer.

This is due in no small part to the fact D-Link makes a lot of stuff. Security cameras, routers, switches and extenders galore.

And for most of that time I've been pretty impressed. As soon as new networking technologies emerge - like voice control, better encryption protocols and even new Wi-Fi standards (get ready for 6e) - D-Link has always been quick to adapt, offering these new bright-shiny features in every way you can imagine - from entry-level domestic products through to more industrial, enterprise solutions for business.

In fact, I've been so impressed by D-Link's gadgets, I've incorporated many of them into my own smart home configuration, where they've proved to be reliable and useful.

But the EAGLE PRO AI AX1500 mesh system is evidence even the best tech brands don't get it right every time.


February 2022 saw D-Link launch its new EAGLE PRO range of networking devices in this region for the first time. This basically means a new router, a new mesh Wi-Fi option and a new wall-socket extender, all of which look strikingly familiar to their predecessors other than the quad-antenna router is now white, not black.

I was excited to get my hands on some of this gear though, as I live in a fairly large, four-bedroom, two-storey home and achieving truly reliable, consistent and fast connectivity has often proved a challenge - especially these days when I have several smart devices installed outside the house as well.

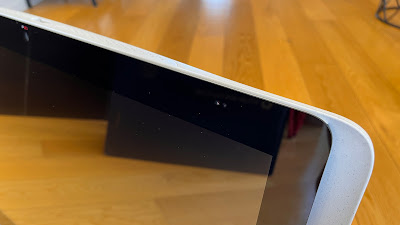
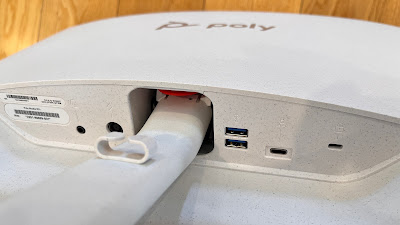
While D-Link's new R15 router is not yet available, I have been able to install the M15 three-pack EAGLE PRO AI system to find out if it could improve on my current mesh arrangement.

I've tried the previous COVR-1103 system; at a glance it looks identical - three small white boxes, each with a couple of ethernet ports in the back. Both systems still retail for the same price; NZ$399.99 - which seems a bit strange as I assumed the new EAGLE PRO AI option was supposed to be superseding the old model with the latest Wi-Fi 6 standard, faster download speeds and the promise of a few more square-metres covered.

Of course, as I've pointed out previously, if you upgrade from Wi-Fi 5 to Wi-Fi 6, you'll have to manually reconnect all your existing devices, even if you use the original network name and password. Also, you can't create a mesh network with a mix of both Wi-Fi 5 and Wi-Fi 6 devices - I guess that could be why D-Link is still selling both options with identical price tags.

At first, the setup process had me flummoxed. In recent years the D-Link Wi-Fi app has become very streamlined and user-friendly, walking you through the setup for any networking device in a few clear steps once you scan the QR code on the base of the gadget.

Foolishly, I tried the same thing with the M15 and was frustrated when the app didn't recognise it.

Turns out, D-Link has developed a separate EAGLE PRO AI-specific app. I don't really understand why though, as it looks and functions exactly the same way as the D-Link Wi-Fi app I've used a million times before. Apparently D-link must have big future plans for the EAGLE PRO brand and felt the need to differentiate these initial offerings from the outset.

To be fair, the process seemed even more straight-forward and efficient than ever. The progress circle I've previously complained about moved much faster between steps and I'd created my new AI-based mesh network in a matter of minutes - especially given the two satellite routers required no setup at all, they just pair with the primary router automatically once powered up.

As with most other similar D-Link devices, by using the app you can quickly access and modify settings like parental control - granting or denying Wi-Fi to any connected device. You can also link to Amazon Alexa or Google Assistant for voice control, manually prioritise connected devices and even use "Health Mode" to schedule times when the Wi-Fi shuts down completely.

Importantly (well, for me anyway) you can also toggle the small status LED on and off and this also turns off the lights on the front of each of the satellite units too.

So everything was up and running. Initial speeds were good. I seemed to have coverage everywhere I needed it. Not bad for four-hundred bucks.

Then it all went wrong. Each unit kept rebooting itself - including the primary router. It wasn't all the time but it happened pretty frequently. This meant I was constantly getting notifications from various IoT devices around the house complaining they'd lost connection with the internet. Then often informing me they were back online a few minutes later when whichever EAGLE PRO AI device causing the issue had fired itself up again.

Not good. If this is AI networking, I think I might stick to manual.

After about 24 hours of this, I went back to the drawing board and ran the setup again - this time resisting the temptation to connect any other devices to the available ethernet port on the primary M15 router. Again, setup was problem-free and this time I discovered a setting in the app I'd missed before; the AI Wi-Fi Optimizer. According to the description, this would automatically seek out the cleanest W-Fi channel and produce a more reliable mesh network across all my devices.

Indeed, these adjustments seemed to make a big difference. My download speeds increased dramatically and I experienced no more pesky dropouts...

...until the small hours of the following morning when yet again, the primary M15 unit rebooted itself again for no discernible reason. I got home to find everything back up and running again, although the two satellite units were now flashing white - indicating a weak signal despite running perfectly the night before. Even more mysteriously, the app showed both units to have an "excellent" connection.


The EAGLE PRO AI oddness doesn't end there. Sometimes the satellite devices appear as "extenders" in the app - sometimes they disappear and you can't access them, although you might find them listed as a "client" instead, along with all the other connected devices in your home.

Sorry, but life's too short for this.

As you can see from these screenshots, I generally have at least 40 devices connected to my home network at any given time. Is this to much of a workload for a dual-band array? It shouldn't be, I've done it before. Perhaps if I was using the new R15 router as my primary device and running the M15 mesh units off that instead, everything would be running smoothly - and once I get my hands on one I'll be sure to give it a try and report back.

In the meantime, the M15's are going back in the box.


Click here for more information and pricing on the D-Link M15 EAGLE PRO AI AX1500 mesh system.

Wednesday 16 February 2022

Why Haven't You Got a Robot Vacuum Yet?

In a matter of months I've gone from never even considering a robot vacuum cleaner to never ever wanting to live without one. I'm a total convert.

Why?

Well, a lot of reasons actually.

Firstly, there's nothing like not having to do the vacuuming yourself.

Secondly, as a human being, there's something immensely satisfying about finally having an actual robot in the house that knows what it's supposed to do and just gets on and does it. Evolution, baby.

And thirdly, it's fun to watch.

I'm not kidding. And I'm not just being some weirdo tech nerd. Everyone who's seen one agrees. It's cool as.

But which one should you get? Do you need to go top-of-the-line? Or can you save a few bucks and still get the job done?


The DEEBOT N8 PRO is ECOVACS' midrange offering, priced at NZ$899.00. A few months back I tested the pricier T9+ - and I have to be honest, when I first took the N8 PRO out of the box, it was kind of tricky to tell the difference.

The drive wheels, main brush, filter and side brushes all appear to be identical, which is fine by me as I found the build quality, functionality and durability of all these components to be first-rate on the T9+ - especially the dual side brushes which seem to be less likely to tangle than on other brands of robot vacuum I've tried. On the odd occasion they do get caught up in something, I've found it a simple matter to free the brushes and set the device going again.

This hardly ever happens though because the N8 PRO's TrueDetect 3D Technology does an impressive job of avoiding pretty much any object and the vacuum will back and fill patiently to make sure it doesn't run over that prized teddy bear or half-constructed Lego city.

Just like the T9+, the N8 PRO uses lasers to map your home on its first use. I was surprised to discover its map appears somewhat differently in the ECOVACS app though - there isn't quite the same level of customisations and options available - but almost.

You can still configure the automatically generated map, naming or even merging rooms. You can designate the order you want to clean the rooms in or select a specific area you want to clean. Just as with the T9+, you can also create virtual boundaries (invisible walls) to lock off spaces where you don't want the N8 PRO to go and declare certain areas "no mop zones".

Oh yes, don't worry - just because this device is hundreds of dollars cheaper than T9+, it still offers the same OZMO mopping function. This is the greatest thing since sliced bread. Actually, I like it even more than sliced bread. Just fill the water tank - with water only, no cleaning chemicals required - slot it into place and the N8 PRO is ready to mop and vacuum simultaneously. I have both tile and timber floors in my home and both surfaces come up gleaming every time.

My only frustration with the mopping process is having to manually attach and remove the water tank - due to the N8 PRO's carpet detection abilities, it simply won't venture onto or over any carpeted areas when the mopping attachment is in place. This basically means you can't mop and vacuum your whole house in one go without stopping the process to change attachments.

On the bright side, that auto-detection means no wet carpets or rugs. It also means the N8 PRO knows to increase its suction power when it moves from hard to soft floors. There are drop detectors too, to ensure the vacuum won't drive itself down the stairs or off your balcony. In fact, the N8 PRO is so safety conscious, it'll stop and notify you if these sensors get too dusty to work properly.

If this happens, there's a handy on-board tool to brush that dust away. This is the same cool tool I've used on the T9+ with the angled blade for detangling hair from the main brush head in seconds.

In general use, I've found the N8 PRO performs every bit as well as the more expensive T9+ except for two departments; firstly, battery life is not as good. I have a pretty big house and there's no way it can clean the whole thing in a single run. Not to worry - there's a setting to restart automatically when charged up again. Still, something to consider if you have a large home like mine.

Secondly, unlike the T9+, the N8 PRO doesn't include the DEEBOT Auto-Empty station. Instead, it simply returns itself to a small dock to recharge and it's up to you to lift out the dust bin and empty it. If this sounds too disgusting for you to even contemplate (it really isn't - it's a very simple, fuss-free process, but what-evs) you can buy the Auto-Empty station separately. It'll set you back NZ$399.00 though, meaning the whole caboodle will work out just a hundred dollars shy of the T9+ bundle.

Personally, neither the battery life or manual emptying are game-breakers for me. While the total cleaning time may be a bit longer due to a mid-clean recharge, given you can set the N8 PRO to run on a schedule when you're not around, it doesn't have to be an issue. Emptying out the dustbin takes a grand total of about thirty seconds. And while the deodorising attachment that comes with the T9+ is a nice-to-have, I certainly wouldn't label it a must-have.

What that all boils down to is the N8 PRO is a very full-featured device. Its abilities to mop, avoid obstacles and drops and automatically change suction depending on the surface far exceeds its mid-range price tag. For much less than the cost of other high-end stick vacuums you can snare yourself a robot that literally cleans the house while you're not home. So what are you waiting for?


Click here for more information on the DEEBOT N8 PRO.

Monday 14 February 2022

Smarter Aircon Revisited

It's been a couple of years since I first tried the tado° Smart AC Control V3+ but I thought it might be a good time to check back in for a couple of reasons.

Firstly, it's always good to see if a product that impressed straight out of the box is continuing to do so a year or two down the track.

Secondly, it hasn't been replaced or upgraded - it's still the same tado° Smart AC Control V3+ from 2020.

And lastly, I don't know if you've noticed but it's been hot lately. The worst kind of hot. Extra moist. The kind of heat that keeps you up all night and makes it impossible to breathe during the day. Question-the-meaning-of-life-on-this-planet kind of heat. You know what I'm talking about.

So I've been using my tado° a lot.


Let me give you quick refresher on exactly what we're dealing with here - and it will be quick because it's still one of the most elegantly simple devices it's ever been my pleasure to use.

The tado° Smart AC Control V3+ is a white plastic panel about the size of drinks coaster (100mm square). You stick it to the wall somewhere within sight of your heat pump, connect it to your Wi-Fi and boom, your aircon is now Wi-Fi enabled.

This means you can now control it via the tado° app, from anywhere. 

It gets better; tado° also integrates with Google Assistant, Apple HomeKit and Alexa, so if you have a smart speaker, your aircon is now voice-activated too.

All for under NZ$200.00. Not bad.

I set my tado° Smart AC Control V3+ up in our bedroom where we're fortunate enough to have a small Toshiba heat pump we don't often use except when it gets very, very cold or yuck, horrible hot like it has been lately.

The main reason we didn't use to use it more was it was just too damn tricky to get right. I'm not criticising the heat pump itself - it's very full-featured. You can adjust temperature, fan speed, the angle of the air-flow and there's a timer so you can pre-program how you want.

In theory.

Trouble is, the remote sucks. Unless you're prepared to study the manual from cover to cover, memorise it and what all the stupid little symbols are supposed to mean you're usually left with a freezing cold gale blowing at full volume on you or your partner or both in the middle of the night. Not ideal.

My initial experience with tado° Smart AC Control V3+ made all this go away. 

The tado° app is so clearly laid out and easy to use, I've never picked up the original Toshiba remote again. Of course, the tado° Smart AC Control V3+ isn't just a Toshiba thing; it's compatible with dozens of other brands and models.

Which is probably why setting it up is a bit of a mission and really the only dreary thing about the whole tado° experience.

You see, I've found my tado° Smart AC Control V3+ so useful, I now have a second one in my living room to control our larger heat pump which is the primary source of heat (and cool) for our whole home. I'd forgotten it takes a bit more than just plugging in the device and powering it up to get it to work. Sure, the app walks you through each step but there are a few of them - including connecting to your Wi-Fi and training the little box to recognise your particular heat pump so you can get the most out of all its features. That last part even involves using the app to take a picture of your remote to cross-reference it with the tado° database. This all takes a bit of time so you'll need to be prepared to not use your phone much while you're doing it.

On the bright side, once I had my new tado° up and running, I realised I had more access to extra fan settings and airflow controls than I did on my original unit. I deduced this must mean the tado° database is now probably a lot more comprehensive than it used to be so I decided to reset my original device and set it up again from scratch. Sure enough, I now have extra fan speeds and tilt-control in the bedroom too. Yay for upgrades!

The app seems to offer more insights than ever before too - giving you a full rundown of current air conditions in every room you have a tado° device installed (you can have up to 25 in one home) not to mention guidance on how to use your tado° Smart AC Control V3+ to make your aircon work more efficiently.

This is best utilised in conjunction with an Auto Assist subscription - for NZ$39.99 a year, you can set your aircon to respond automatically to things like windows opening, members of the household coming and going and changing weather conditions. Even without subscribing, you'll still get notifications about open windows and obviously you can set up various schedules and timers for different rooms.

So basically, I still love it. In fact, if anything it seems to offer more than ever before. Don't feel the need to modify this device, tado°. It definitely ain't broke, please don't fix it.


Click here for more information on the tado° Smart AC Control V3+.

Wednesday 9 February 2022

The Sound of Success

We have officially evolved.

Well, officially according to me anyway. We're not joining a video call using the built-in mic, camera and speakers on our tiny little laptops anymore. We're so past that. The sound quality on a tablet? Probably no better. And we're definitely not doing it on our phones. Nah uh. No way.

We need lights. We need a decent camera. We need speakers or at least great earbuds or headphones. And we absolutely must, must, must have a quality mic.


The Thronmax MDRILL One Pro might just be that mic. Let's get the silly stuff out of the way first; it looks great. When people see my Thronmax mic on a video call, they invariably comment on it, telling me how cool they think it is. In fact, Thronmax seems to have put quite a lot of effort into making it look so groovy.

Not only is the overall shape of the MDRILL One Pro reminiscent of the studio mics you think of in radio and recording studios, there's also an LED display to show both mic and headphone levels on the front and what's described as a "Mood Lighting Ring" around the base which can be cycled through any of seven different colours... depending on your mood, I guess.

The mic includes its own desktop stand in the box but I've been using it with the Thronmax Caster Boom Pro. Like the MDRILL One, the Caster Boom definitely deserves its "Pro" moniker. Between its internal spring system and hidden cable management, it certainly looks and feels just like the mic booms I use in my studio at Newstalk ZB. There are large, easy-to-adjust tightening wheels on each hinge and it comes with a comprehensive range of adapters to fit pretty much any mic imaginable - even a fully adjustable ball-and-socket connector for ultimate manoeuvrability. Weirdly, it also features something labelled on the box as an "On-Air LED Control" - it's a light that looks a bit like the on-air lights in my radio studio. Except, once you plug the mic in, it stays on all the time - not just when the mic is turned up. Even weirder; you can swap between red and white just by touching it. Nope, I don't get it either.

Unnecessary and pointless light aside, it's a great boom that lets me position the mic anywhere I need it around my workstation.

Which might be quite a number of places because the MDRILL One Pro is a very versatile mic indeed. There a four dedicated recording modes; Cardioid, Stereo, Bi-Directional and Omni-Directional. That means you can record yourself, a two-way conversation, a group chat or even instruments and you'll capture everything. Certainly having that stereo mode brings an extra dimension when recording things like acoustic guitar or drums; you can now mix the squeak of fingers changing position in one side with the resulting strummed chords in the other, or literally hear that drum fill travel from left to right.

If you want to get really technical, Thronmax claims the MDRILL One Pro uses something called VERTIGAIN technology to increase quality and clarity. This is achieved by ensuring sound waves hit all three condensers without being scattered by microphone mesh - note the vertical slots on the mic. Apparently sound waves move vertically. I really should have paid more attention in seventh form Physics.

While I won't pretend to fully understand what's happening with all that, I do know the result is crisp and clear, as promised. I'd also add warm and full to that list of adjectives. If you thought your built-in laptop mic or the one on your webcam was doing you any favours, wait to you hear the difference. It's not even close.

Best of all, there's no real setup involved - all the controls are on board the mic itself. A mute button, a selector button to cycle through the four recording modes and a button on the base to choose your preferred "Mood Ring." You'll also find a 3.5mm headphone jack on the base, so you can listen to what you're recording in with no latency. If you've ever done any digital recording, you'll know by the time your signal is sent to the computer, encoded and played back out of whatever audio editor you're using, the delay can be actual seconds. This jack mitigates that lag completely. Headphone level is controlled by a pot at the back of the microphone, below another pot for mic gain.

In a nutshell, the MDRILL One Pro is a very full-featured USB mic priced at a rather reasonable NZ$179.00. Do yourself a favour and put your best foot forward at your next online meeting. If communication is key, it's long past time to clear it up once and for all.


Click here for more information on the Thronmax MDRILL One Pro.

Click here for more information on the Thronmax Caster Boom Pro.

Monday 7 February 2022

Where Are All the Electric Motorbikes?

I'm no thrill-seeking daredevil.

There may have been a time in my youth when I got a kick out of going fast, dropping from heights and hanging upside down. But I barely remember those days now.

I've certainly never been a motorcycle guy. That was my older brother. His regular crashes were probably main reason I was never a motorcycle guy.

However, I am a practical guy. I'm a guy who loves a good idea. And there's no doubt I'm a gadget guy. So when I see high-speed chases on electric motorbikes in action movies I think, "Of course! That makes perfect sense. The battery to drive a motorbike probably doesn't have to be very big. The power and acceleration on offer from an electric motor would be exhilarating (if my limited EV experience is anything to go by) In short, an electric motorbike seems like the most obvious form of transport that should be being produced right now.

So where are they all?


Well, thank goodness UBCO's here anyway. Of course it's a kiwi start-up - if you want something done right... right?

The UBCO 2X2 Adventure Bike is not one of those streamlined, spaceship-looking motorbikes of the future I've been watching in my action movies. In fact, I've even heard people describe it as ugly. I disagree but then that's probably my practical side coming through again - all I saw when my UBCO first arrived was one of the most purpose-built things I've ever encountered.

Remember, this is not an electric bicycle. In fact it resembles a farm bike more than anything and I'd suggest that'd be a fantastic use for it. Actually, I don't have to suggest that; plenty of farmers are already using them. In effect, an UBCO is a strong, alloy frame with some wheels, handlebars and a seat attached. And that's all - other than the battery which is easily dropped into place - nice and low to help with the centre of gravity.

As with any EV, it's really all about the battery. Here, UBCO comes to the party with the KXH Power Supply; a 3.1kWh capacity, IP66 water and dust resistant and 120A peak current. UBCO claims this gives the 2X2 Adventure Bike a range of up to 120 kilometres, which could well be true. I didn't have my review unit long enough to drive it that far but based on how slowly the charge-meter went down as I did ride around the place, I wouldn't be at all surprised.

Learning to ride the UBCO involved a rigorous thirty-second conversation with the guy who dropped it off. Turns out, that really was pretty much everything I needed to know. There's an On switch. You push it again to put the bike in drive then it's a throttle on the right hand-grip as usual. Because we're electric, there are no gears or clutch to worry about. It's kind of like riding a bike.

Although the acceleration is pretty instant, the 2X2 Adventure Bike is speed limited to just 50km/h and as such, falls under moped rules so as long as it's registered, any licensed driver can ride it on the road. As you'd expect, indicators, headlight and horn are all within reach of your left thumb and there are two basic rear-view mirrors to keep an eye on any speedsters from behind.

So within moments of getting your UBCO home, assuming the battery is charged and ready to go, you can be off to the shops, making your deliveries, running the fence-line on the bottom paddock or any of dozens more activities it would be perfectly suited to.

Speaking of charging, UBCO offers a fast, 10AMP charger that twists securely into place and disables the bike while connected. You can also charge via the same EV charging stations you've seen in carparks all over the place. Best of all, because you can drop the battery in (and out) in a matter of seconds, there's nothing stopping you having a second KXH on charge, ready to swap out should you hit that 120km range.

But just because the 2X2 Adventure Bike is road-legal, that doesn't mean you have to stay on the road. As the name indicates, both wheels have their own motor; so no chain and almost no chance of getting stuck - especially given the bike only weighs 70 kilos and can actually be lifted onto UBCO's own bespoke towball mount bike rack for easy transport from place to place. Another obvious use case here would be on the back of a camper van. What better way to be able to zip off for supplies when you're already all set up at your camp site?

In fact, the first UBCO I saw in the wild was at Okere Falls on the shores of Lake Rotoiti. A guy came whizzing into view, presumably from his bach on the side of the lake somewhere, to pick up a few essentials from the store. The frame of the 2X2 Adventure Bike is totally modular, so you can tailor it to your specific needs - he had big baskets for all his goodies front and back. It was pretty cool.

In fact, I find everything about UBCO pretty cool - you can even access the bike via your smartphone, using the UBCO 2X2 app. This let's you keep your bike's firmware up-to-date, monitor stats like power supply, run-time and engine temperature, fine-tune some settings and it can even be used as a live dashboard if you prefer your phone's colourful display to the reasonably modest one on the bike itself.

Starting from NZ$7999.00, this is a genuinely versatile, powerful EV that, quite apart from anything else, is fun. Really fun. Between the all-wheel drive and the wonderfully forgiving suspension, I couldn't resist taking this thing places I wouldn't even attempt to ride a mountain bike, let alone a motorbike.

Turns out I might still have a little bit of daredevil left in me after all.


Click here for more information and pricing on the UBCO 2X2 Adventure Bike.

Wednesday 2 February 2022

Your WFH Office Is Now a TV Studio

The new normal. Okay, there isn't really a "normal" anymore but everyone keeps calling it that anyway. Although the future has never been more difficult to predict, one thing seems certain; work habits have changed forever.

Even if you're back at the office by now, chances are it's not every day and it's even more likely the events and meetings you used to attend in person have now moved online.

And why not? If the pandemic has proved anything it's that we actually had the technology sitting there waiting to make remote working more possible than any of us thought.

So now we've got it working, it's probably time to streamline and upgrade. If we're going to keep doing it, let's do it better.


The Studio P21 from Poly is kind of a one-stop-multi-media-shop that connects to your existing Mac or PC via a single USB cable. It's a 21-inch display, a camera (with privacy shutter), stereo speakers, mic and ambient lighting - all in one very tidy package.

First off, it's just a great external display. If you've been battling away, squinting at a little laptop screen the whole time you've been working at home, this is a fine way to get some serious screen real-estate back. Even if you're happy with your existing monitor setup, never underestimate the advantages of adding a second screen. Even as I write this, I have this page open on my main screen and the Poly website open on the Studio P21 for easy reference, without having to click between tabs. That's just the beginning of course. Audio and video editing becomes much more intuitive if you can have the controls on one screen and the files on the other. And that's before you get to the main reason this product exists at all - video conferencing. There's no reason you can't keep working while taking part in an online meeting - a dual screen array is ideal for that.

At first it seems oversized for what it is; a 21-inch monitor is already pretty substantial on most desks and the Studio P21 is a lot taller and wider than just the display itself. There's a kind of slightly curved shell that wraps around the back, reflecting both light and sound towards you. The concealed vanity lighting that runs down each side of the screen is a big part of what makes this device so unique. Normally to enhance the lighting for your video calls requires a whole extra accessory, which just takes up more desk space when not in use. Not here, it's all included.

Meanwhile the whole thing sits on an attractive enough, off-white stand which slots into place with a single click. The stand also doubles as a useful storage tray for things like phones and earbuds - a very useful storage tray, as it turns out. If your phone and buds charge wirelessly, there's a charging pad for them right there in front of you. What a fabulous little add-on.

The full fidelity stereo speakers produce surprisingly warm and spacious tones - not just clear reception on video calls but it's actually worth setting the Studio P21 as your default speakers if you don't already use external ones for your laptop or desktop computer. Music sounds rich and there's way more bass than you'd ever hear from anything a laptop would produce.

Setup is relatively straight-forward, although it does involve downloading and installing not one but two different apps for some reason. You'll need Poly Link Desktop to adjust all the settings and the Display Link drivers so your source device knows what to do with the Studio P21 when you plug it in. This is via the supplied USB lead with its own USB-C adapter attached if required.

Once powered up, you can jump into the Poly Link Desktop to configure all the usuals; brightness, contrast, backlighting etc. There are also status LED's you can set to notify you of your call status, if a device is charging on the wireless pad or even if the Studio P21 is just idle. Needless to say, I turned them all off. I hate LED status lights.

What is useful are the "Rocket" and "App" buttons; two touch controls on the bottom left bezel which can be cutomised do things like answer calls, turn the ambient lights on and off and launch apps like Zoom or Teams.

I had an issue getting the App button to start anything on my Mac, even though its icon would change to that of the associated program when I set it up. I also experienced a frozen feed if I started my video app before opening the Poly Link Desktop controls window. This was easily sorted by restarting my video app and I assume it's just one of those niggly compatibility issues you run into every now and again when using non-Apple accessories with a Mac. I wouldn't be surprised if everything functions flawlessly on PC.

That's been my only bugbear though. I've loved having the versatility of a dual screen setup at home and obviously it would be equally useful in most office environments too. The display is large, clear and bright - not the brightest I've encountered but bright enough. Certainly, both the mic and speaker quality are standout and having all that, plus ambient lighting, integrated into one simple device is a godsend. 

If you have to work at home, at least know you don't have to work tied down to that tiny laptop anymore. I've seen the Studio P21 advertised for under NZ$1500.00 and I consider that to be pretty good value given it's essentially four or five cool gadgets in one. At least. 


Click here for more information on the Poly Studio P21 personal meeting display.

Tuesday 1 February 2022

The Most Comprehensive Way to Keep an Eye On Them

The other day a colleague rang me to ask what sort of phone he should buy his ten year-old.

This is a conundrum most parents find themselves in sooner or later. You want the safety and reassurance of being able to stay in contact with your child when and wherever. At the same time, once they have unlimited access to all the wonders (and evils) the world-wide-web has to offer, there's no putting that genie back in the bottle.

That's why I immediately recommended an iPhone.

Starting at NZ$749.00, you might think that's a big investment for a ten year-old and it's hard to disagree - except Apple offers a lot of family-friendly features that give you a lot of control with how your kid interacts with the world online.


To begin with, under-thirteens can't even create their own Apple ID, they'll need the Family Organiser (you) to do that for them.

From there you have access to a mindblowingly long list of permission settings you can customise to your preference, although some will be set by default, depending on the age of the user.

The key to all this is simply to search for Family Sharing in your settings menu. Oh, yes - you'll need your own Apple device too. Doesn't have to be a phone of course, an iPad or Mac will definitely suffice. Family Sharing isn't just for kids either; you can invite up to five other family members to share a single Apple Music, Apple TV+ or iCloud storage plan - or even the all-encompassing Apple One subscription. Everybody benefits.

Family Sharing also enhances the abilities of your Find My app. Not only can family members easily share their locations with each other, you can also create location-based alerts. For example; if your daughter leaves football practice, you can set up an automatic notification to let you know she'll be home in a few minutes and you'll have muddy boots to clean. Yay.

But let's refocus on the younger family members. Obviously, being able to search up their location is a tremendous way to keep them physically safe but what about once they enter the virtual world? As the Family Organiser, at any time you can open and adjust the access settings on your child's device from your own settings menu. 


Ask to Buy is a useful feature that means your kids can still choose whichever apps they want (or need) but can't actually install them - or more importantly, pay for them - without you granting them permission via a popup notification on your device.


Screen Time is more than just about finding out how long your child is spending on each app or website - or game. It also empowers you to set time limits on an app-by-app or site-by-site basis. Apparently, many parents have been surprised to discover their kids aren't gaming quite as much as they thought they were, so before you go parent power crazy, putting extreme limits on every game in sight, it would pay to have an actual conversation with your child to find out what they think is fair... you might be surprised.

Of course, if you want to save yourself some time and stress, you can just keep your child's device PG across the board - that won't just keep all the apps, games and websites kid-friendly but it'll filter out more adult TV, movies and music too.

There's a school of thought that suggests using any kind of device immediately before bed isn't a great idea - flashing lights, loud noises, intrusive notifications - apparently these sorts of things aren't particularly conducive to a restful night's sleep. Who knew? Luckily, there's even setting called Downtime, which blocks all notifications and displays a badge on apps to show they can't be used.

That's before you even get to all the content your kids probably should be accessing. Next time you're browsing the App Store, search "Educational" and you'll be staggered by the sheer volume of quality content available for students of all ages, much of it free. From Montessori Preschool and Cosmic Kids for the real youngees, to teaching primary schoolers the basics of Augmented Reality with AR Makr, the list is pretty much endless. Any high school student learning a language has probably already jumped into Duolingo and even the parents' worst nightmare of helping kids with their maths homework is made easier with Photomath.

None of this stuff is supposed to replace real, hands-on parenting. These are just tools to help you stay on top of it. A less-stressed you, probably means a more relaxed, ready-to-learn kid too. So the next time you hear that familiar whine, "When can I have my own iPhone?"... it may actually be worth considering.


Click here for instructions on how to set up Family Sharing.

Click here for instructions on how to set up Find My.

Click here for instructions on how to set up Ask to Buy.

Click here for instructions on how to set up Screen Time.