Monday, 24 August 2020

THE LATEST BEST WATCH

Samsung has been making smartwatches for a very long time now.

Unfortunately for them, they got very good at it quite early on and it must be quite a challenge to improve a device that already looks great and works well.

Fortunately for me, I've been able to try most of them and I'm definitely a fan.

So it seems only logical I should put the latest version through its paces...

At first I was kind of reluctant to put the Samsung Galaxy Watch3 through too many paces because it looks so damn fantastic. Admittedly, not a massive departure from the overall design of the original Galaxy Watch but there are tweaks and refinements to be found everywhere. The casing - in either Mystic Black or Mystic Silver - is more rounded, the connections to the strap are finer, the buttons are now round and the bezel (yes, the rotating bezel is back!) is thinner yet more "clicky" than before. The Watch3 also comes in Mystic Bronze with a pink strap - but only in the smaller, 41mm version. As I've been using the 45mm model, I won't be commenting on the differences between the two - there are a few but mostly pretty minor ones.

Perhaps the most striking enhancement is the Galaxy Watch3 now comes with a genuine leather band with contrasting stitching. There are pros and cons here - the strap looks so good... yet it's obviously not most people's first choice when working out. There's no alternative included in the box although any standard 22mm band will fit. I accidentally wore the Galaxy Watch3 in the garden the other day without swapping out the strap with a more durable one. Luckily, when I came inside after a couple of hours' tree-planting, the marks on it were dirt, not scuffs and they wiped off. Underneath was a different story - there was quite a sweat stain soaked into the leather. It eventually dried out but I certainly wouldn't choose this strap for exercise.

Which is a shame, as there are many new Samsung Health features to get excited about. This is Samsung's fitness app, an app that's become very comprehensive indeed. Unlike the fitness ecosystems with other phone/watch combos, Samsung Health can be installed on any smart phone and the Galaxy Watch3 can be paired with any phone too - yes, Android or iPhone. This means you can track all your progress in great detail.

I've been using Endomondo, a third-party app to monitor my workouts for years, primarily due to the sheer number of different kinds of exercise it will track. Now I'm having a second look at Samsung Health. Not only will it track everything from running and swimming to arm curls and yoga but there's so much information stored from every workout. The GPS tracking looks to be bang on and is displayed on a shareable map. All the usual stats are there - splits, pace, elevation etc. and a new one that'll appeal to the more serious runners; cadence.

I found heart rate monitoring to be good - but you have to be wearing the Watch3 a notch tighter while working out to get a really consistent reading. You can now also measure your blood oxygen levels too - this is a great way to keep an eye on any developing health concerns, especially if you suffer from asthma or other cardiovascular conditions.

Blood pressure, VO2 max and ECG readings are also on the way once Samsung has approval from the relevant health authorities. This is a very capable fitness device indeed.

There's even an option to download guided workouts in the Samsung Health app, cast them to a compatible smart TV and you'll see the info from your Galaxy Watch3 displayed live on screen. Nifty. Especially when access to a gym is a bit hit or miss depending on lockdowns these days.

Of course, the true beauty of this watch is not just its beauty, or its fitness functionality but how genuinely smart a smartwatch it is. As I said at the top, Samsung has been doing this a long time. The rotating bezel has been universally praised as one of the most user-friendly methods of navigating from the main display to incoming notifications and a host of useful widgets. The Galaxy Watch3 runs Spotify, makes and receives calls, shows your calendar... you can even run Powerpoint presentations. It runs faster and smoother than before and the screen is brighter and clearer than ever - especially outdoors where I've always struggled a bit with the original Galaxy Watch.

In terms of battery life, there doesn't seem to be any dramatic improvement here, although my typical usage means I take my watch off every night so as long as it makes it through a full day I'm happy. The Galaxy Watch3 will last at least  a day and half with all the sensors and connections running at full tilt. A small, magnetic, wireless charging puck is included in the box and it also charges reasonably quickly using the reverse charging option on devices like the new Samsung Galaxy Note 20's.

Of course, if you're into sleep tracking - something else the Galaxy Watch3 does a fine job of - you'll have to find another time to charge it up. The best charging news possible, as far as I'm concerned anyway, is you can now turn off that annoying charging display that's been lighting up my bedside table for the last year or so. Finally.

There's some bad news though. Samsung's native Email app seems to have completely disappeared. That's not to say you won't still be able to receive and reply to Email notifications, like you can from any app on your phone. However, it's no longer available as a standalone app on the Watch3 itself. This means you can't read the full text from long messages or review all the emails in your inbox. What's even more worrying is Microsoft Outlook is available as a dedicated Watch3 app. Okay - maybe it's not worrying if you prefer Outlook over Samsung Email but I don't. It's a sure sign the growing relationship between Samsung and Microsoft is leading to the end of Samsung Email altogether. Very annoying for me because until Outlook offers a split-screen view in its mobile app, I'm using something else.

Is one missing app any reason not to buy the Galaxy Watch3? Of course not, don't be ridiculous. Especially when, as I've pointed out, I can still reply and interact with my preferred email app far more comprehensively than I'd be able to on most other smartwatches. In fact, that's pretty much true for every aspect of the device. No other watch connects to more phones, has more functionality and looks this good.


Click here for more information and pricing on the Samsung Galaxy Watch3.

Tuesday, 18 August 2020

SMALL AND MIGHTY

In just a few months I've gone from never having even touched a Huawei laptop to being absolutely enamoured with them.

Not so long ago I reviewed the Matebook X Pro and was quite frankly blown away. It was powerful, feature-packed, with a fantastic build quality and a wonderful display.

So what happens when you take all that and make it a bit smaller?...

If you're thinking, "Wait... Haven't I seen that somewhere before?" the answer is you have and you haven't. At first glance and with no reference points to judge scale, you could be forgiven for confusing this picture of the Huawei Matebook 13 with images of the Matebook X Pro. I can assure you, the smaller model is a couple of centimetres more narrow.

But here's the thing; I've used both devices and I'm really struggling to detect the Matebook 13's limitations.

The main reason for this is the differences between Huawei's flagship notebook and this pared-down version are not really performance-related. Both devices combine Intel's 10thGen i7-10510U processor, a generous 16GB of RAM with a combination of Intel's integrated graphics and a dedicated NVIDIA GeForce MX250 card. So in essence, the brains are the same. Not only does that latest CPU and hefty RAM combo keep things running smoothly and quickly but Huawei's ability to auto-switch between graphics cards conserves battery and allows the raw computing power to be diverted to where it's needed most.

As I say, this high-end setup is the same for both the X Pro and the Matebook 13 and because the demands from the Matebook 13's display aren't as great, potentially the smaller device may even perform more powerfully. I've certainly encountered no shortfalls no matter what I've thrown at it; audio editing, streaming, multi-tasking - you name it.

So about that display... While it's true the Matebook 13 sports an IPS LCD screen as opposed to the X Pro's LTPS version, the difference in resolution and brightness is pretty hard to pick up. Is there really much of a gap between the 2K and 3K FullView displays? Not that I can tell. Both offer ten-point touch capability, both let you screenshot with a three-finger swipe and most importantly of all, as far as I'm concerned anyway, both have a 3:2 aspect ratio. I've decided this is definitely my preferred shape for a laptop screen as it just seems to provide so much more desktop area to place different windows onto. Touch-wise, I've found the display to be super accurate and combined with the wide, responsive and clicky touchpad, I haven't felt the need to plug in a mouse, even when editing.

Watching Netflix and other video is great - not only is the picture quality excellent but the dual speaker array performs well too. Unlike the X Pro, there are only two speakers, not four but audio is clear, fairly loud and the stereo separation is top notch. I'm not suggesting this would be my preferred device for listening to my favourite Spotify playlist - not through the speakers anyway. But in terms of binge-watching a few episodes of Ozark in bed, awesome.

The twin microphone array on the Matebook 13 doesn't quite match up to the quad system on the X Pro either. Video calls are absolutely fine without blowing anybody away with sound and video clarity - although thanks to the 2x2 MIMO dual WiFi antennae, connectivity is extremely reliable.

There are two other fantastic features the Matebook 13 shares with the X Pro; the power button fingerprint reader and Huawei Share. While we're all used to securing our smartphones with a fingerprint, it's a relatively new feature on laptops. The great thing about the sensor on this device is it works straight away; even though the laptop still takes a few seconds to boot up, it reads your fingerprint the moment you push the power button so you don't have to log in again, instantly bypassing the welcome screen. So cool.

Huawei Share is even cooler. This is the feature that enables you to mirror your Huawei phone on the Matebook 13's screen with a single tap. This doesn't require an internet connection as it uses NFC instead. Not only can you keep an eye on notifications from your phone but you can swipe files and photos between both devices wirelessly. It's like a magic trick.

I can't stress enough how well this laptop runs. There's basically no bloatware pre-installed, only the PC Manager app which does a brilliantly quiet job of keeping all your drivers up to date. The edge-to-edge keyboard has good travel and isn't at all cramped given the small size of the device and the bezels around the screen, while not quite as invisible as those of the X Pro, are still pretty skinny for a laptop. This is a powerful computer with excellent battery-life, small enough to fit in any briefcase, satchel or schoolbag - even handbags. And because it charges via USB-C, you can use the same charger for your phone as well.

I'd prefer to see a standard USB-A port alongside the two USB-C's but I guess you can't have everything. That's why they invented docks and adapters I guess.

One port short; that's basically my only gripe with this little beauty. It's a joy to use and I'd recommend it to anyone.


Click here for more information on the Huawei Matebook 13 2020.

Wednesday, 12 August 2020

MORE THAN JUST PRETTY LIGHTS

Personally, RGB is not my thing.

I've said it many times before but like the grumpy old man I am, I'm happy to repeat it; I'm not a fan of flashing lights. If there's an option to dim a display, I'll take it. If I can turn LED's off, I will.

You know how kids are useless at switching off the lights in rooms they're not in anymore? Yup, I'm that guy who follows them around the house turning them all off again - usually while muttering under my breath.

However, like most people, I do have a favourite colour. So if there's an option to customise something in a hue of my choice, I'll take it.

I also realise if you're going to the trouble of building your own PC, you probably want to trick it out a bit...

First up, PNY XLR8 RGB RAM is still RAM. Yes, we'll get to the RGB features shortly but you're going to be hard pressed to pick up high-performance memory like this for much cheaper. At just $148.99 for the pair of 8GB modules I was sent to review, you're well on your way to a pretty decent rig for not much money. The really good news is, it works.

Strangely enough - and impressively, although I usually run a 32GB RAM configuration in my desktop, I actually didn't notice much of a drop-off in performance with the 16GB of XLR8 in its place, if any. This is of course down to the fact performance factors like sheer speed aren't just due to memory but what your CPU, graphics card and in fact, your motherboard itself are capable of. Luckily, while the XLR8 modules are capable of 3200MHz, they're backwards capable down to 2133MHz so should be compatible with a wide range of systems.

I certainly didn't have any issue firing it up with my several years-old rig... well, not once I remembered which two RAM slots I was meant to be fitting them into, anyway. I knew you were supposed to install pairs like this into either the two odd slots or the two even slots on your motherboard. What I'd forgotten was my motherboard has configured those odd and even slots next to each other, 1-3 then 2-4. Took me ages to figure out why my PC was only showing 8GB of RAM every time I booted up. Bit of grandad advice for you; get your reading glasses out and double-check which slots are labelled as which.

If you're still labouring along with a basic 4GB (or even 8GB) setup, I really recommend you stop putting it off and upgrade now. Your boot times will improve, apps will launch faster and of course multi-tasking and gaming will be dramatically more powerful and reliable. Don't be afraid, popping out your existing RAM module and replacing it with a shinier, newer, bigger one is the single easiest thing you can do to mod your desktop hardware.

In saying that, the modules themselves are quite large - partly due to the aluminium heat spreaders and partly because of the significant LED panels at the top. If you're already cramped for space inside your desktop case (maybe you're running some kind of mini-tower or something) installing these things is going to be pretty fiddly. Luckily for me, my cabinet is pretty standard and has a nice big window in the side which is handy, given XLR8 RGB RAM can make everything look so pretty.

The aforementioned light panels on the memory modules are bigger and brighter than any I've tried before and can certainly illuminate your whole rig, even if you don't have other RGB components like graphics cards, fans or cables. The weird thing about the XLR8 RGB's is PNY hasn't come up with any software to mod them with. Instead, they seem to be compatible with everyone else's. That might be an exaggeration but because I have a Gigabyte motherboard I tried Gigabyte Fusion 2.0 and it detected the new RAM right off the bat. Fusion 2.0 is a simple but easy-to-use app for syncing RGB options to my preference.

My preference is not flashing on and off. It's not cycling through all the colours of the rainbow either. Fusion 2.0 can do all that. But my preference is red. Just red. On all the time. It can do that too.

Turns out there are plenty of other RGB customisation apps out there - I tried ASUSAura and that worked just as well. If you have an RGB graphics card, you've probably already got some software to tweak your colour scheme and it seems like it'll probably work with these RAM modules without too much fuss.

So if you thought it was going to be complicated to bring some of that flashy, gamer flair to your existing desktop, or if you're putting a PC together from the ground up and you're looking for an economical memory option, check out XLR8 RGB... just remember to put them in the right slots.


Click here for more information and pricing on PNY XLR8 RGB desktop gaming RAM.

Saturday, 8 August 2020

GET THEM CODING

It's a fact that can't be disputed. The job market has moved on. The landscape has tilted dramatically. Not just between last century and this one. Not just over the last decade.

Even since last year, everything has changed.

Many of the occupations that make the world work today weren't invented when I left school and that's a trend that looks set to continue. So the question is; what do we teach our kids? How do we teach our kids?

Technology is obviously now key in the majority of industries and if you can adapt to new systems and ideas, you're well placed to succeed when it comes to facing the challenges of the future.

This is why many education experts have placed such an emphasis on learning to code - if you are able to manipulate the very building blocks innovation is based on, your destiny is surely in your own hands.

So let's play...

The Osmo Coding Starter Kit breaks coding down to its most accessible elements and teaches those concepts to 5-10 year-olds through three different games, Coding Awbie, Coding Jam and Coding Duo.

If you haven't encountered one of Osmo's interactive educational games before, they use the Osmo Base to incorporate physical objects, drawings and actions into the action on your iPad screen. Osmo describes this as "healthy screen time," as it combines elements of the virtual world with those in the "real" one. The Osmo Base is one of those genius examples of design that's so perfect because it's so simple. There are two pieces that stack together when not in use; the base itself which will accommodate pretty much any iPad from the iPad 2 onwards and the reflector cap which is literally just a mirror that fits over your iPad camera to turn your table-top into a gaming workspace.

There's a wide selection of games available, some of which require no further specialised equipment than a pen and paper. You can literally create virtual features on screen by drawing them on the desk or table in front of you. This is fun, creative and addictive but the Coding Starter Kit takes things to a whole new level.

The kit includes the Osmo Base and 31 coding blocks that fit snugly into a stackable storage container. There isn't really any setup involved other than sitting your iPad in the stand and sliding the reflector on top. The stand is just high enough to leave your iPad plugged in to charge - just. Although there's a space for the charging able it does need to bend sharply for everything to sit flush with the table-top and I worry this could lead to cable damage with prolonged use over time. 

Once you download and open the Osmo World app, you can create a profile easily enough by following the step by step instructions. You can also create a parent/teacher account instead, enabling you to track the progress of your kids or students.

Then it's time to let the coding begin.

Coding Awbie is designed to be the entry-level training ground of the three games you can download to use with this kit. By laying down a combination of action and number tiles in front of the iPad, you can move your monster avatar or "Awbie" through a maze of hazards and obstacles. Initially you'll be prompted with plenty of visual tips and prompts but things get more complicated and challenging quite quickly.

You soon learn the more tiles you can put down at once, the faster your progress towards the various goals and rewards in the game. Many of the action tiles have a rotating direction arrow attached. I found this stiff to turn with my fat fingers at first but it soon loosened up with a bit of use and I was away.

Of course, without even realising it, by creating these sequences in a logical, concise order, you're actually writing programs - programming your monster to follow your instructions. Once your Awbie has munched his fill of stawberries, you can then move on to Coding Jam.

This intermediate-level game is all about combining different audio elements to make music, so rather than steering a monster around a maze, you're telling a band of monsters what to play and when. The game makes you practice before you go into "The Studio" so you can familarise yourself with the different instruments, sounds and rhythms available. Once in the studio, you can create your own little song and even produce a music video to go with it. Again, this is all controlled with the supplied action tiles, perhaps the most important one being the "Rest" tile - not just a crucial musical skill but an important programming one too; it's just as critical for a computer to be told when not to do something as it is to be given an action.

As usual, there are points and prizes to be earned, levels to be upped and once you've become the world's next great record producer, you're probably more than ready to take on Coding Duo, the ultimate test of your new-found coding prowess.

There's a bit more of a narrative to this final installment, the idea being you need to team up with a partner (Awbie and Mo) to go and rescue a collection of Hoppets. This means coordinating two programs at once to achieve a single objective - or two simultaneous objectives. You can play this by yourself or work together with a friend, further developing that most important programming skill of all; collaboration.

While the connection between placing a few plastic tiles on the table with typing pages and pages of code probably won't be particularly obvious to the 5-10 year-olds this suite of games was designed for, I have no doubt the logical processes involved are invaluable skills well worth being ingrained at an early age. These games are fun, tactile and yes, sometimes quite challenging. I'm not convinced you couldn't achieve a similar result with a screen-only app but as part of Osmo's overall philosophy of combining the physical and virtual worlds, I kind of get it.

Most importantly, it doesn't feel like a lesson, it feels like a game and for people like me, that's the best kind of learning.


Click here for more information on the Osmo Coding Starter Kit.


Friday, 31 July 2020

YOUR SIX-SIDED SMART LIGHTING SOLUTION

I first encountered Nanoleaf technology almost three years ago when I reviewed the Aurora, an array of triangular smart panels you can configure whichever way you like, lighting them whichever colour you like or even setting them to respond to sound and music.

While not the most practically useful device I've ever come across, Nanoleaf certainly managed to bring its idea of a modular smart lighting system to fruition effectively and it seemed to work very well.

But I have to admit, when they offered to send me the latest generation to review, my first question was, "How different can it really be?"...


Well for starters, they're Hexagons, not triangles.

This is the first installment of Nanoleaf's new Shapes range; the promise is there'll be other shapes to come that will be compatible with these ones. 

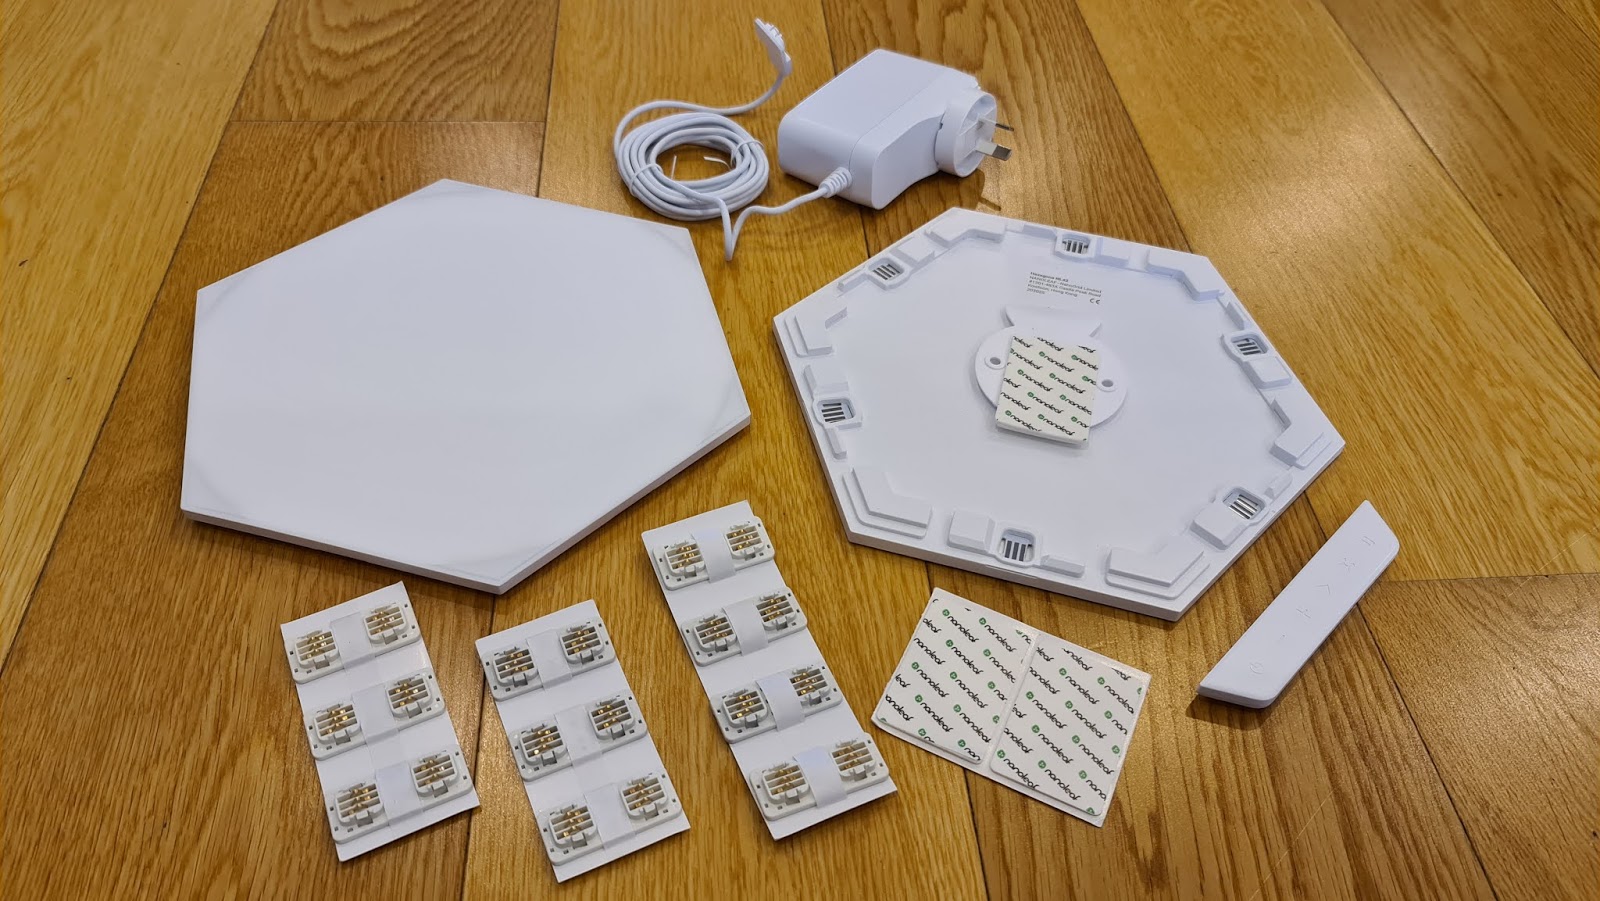
Installation is pretty straightforward; like the original triangles, there are small slots on each side of each Hexagon and you simply connect them together with the supplied linkers, which snap easily into place (or out of place if you change your mind about your configuration). The included power supply and controller units attach the same way and once you've decided on your overall pattern, there's a new mounting system to get it all on the wall.

This is the first big advance from those original triangles I tried back in 2017. There are separate mounting plates fixed to each panel that can be stuck to the wall via 3M mounting strips (pre-attached) or screwed on for a more permanent solution. This is, of course, kind of terrifying if you are nervous about the idea of at least nine points of contact on your nicely painted or wallpapered walls, so I'd suggest having a decent play around with your Shapes setup on the floor before committing to the final hangup. The panels can then be pushed on or pulled off the mounting plates with little fuss.

While there are just nine hexagonal panels included in this starter kit, you can run up to twenty-one from a single power source and up to five-hundred from one controller.

The controller is the second major upgrade. Not only is it now included with the starter pack as opposed to the optional extra Rhythm module of old, it offers quite a range of hands-on functionality before you even open the Nanoleaf app. You can turn the Hexagons on and off, adjust the brightness, cycle through colours and patterns or even shuffle specific Rhythm scenes (patterns that respond to music). This is a lot to play around with in itself - but we're only just getting started.

Pairing the Hexagons with the Nanoleaf app is where the fun really begins. The app is available for both iOS and Android devices and the pairing process was lightning fast... at my second attempt. I use an Android phone and for some reason I initially got myself into a bit of a mess once I scanned the QR code as instructed. There are actually two other pairing methods; NFC and manually inserting a code - I think I messed things up even more by trying all three. Eventually I cleared all the data from the app and started again - to my surprise this time the Hexagons paired instantly. At that point the app opens up an infinite number of options for you to experiment with.

I'm not just talking about toggling the brightness up and down either. There are sixteen pre-loaded scenes of varying colours and interactivity. You can select any of these, shuffle all of them, or create your own playlist of favourite ones. Or, take things a step further and design your own scene; solid colours, flashing, waves, you name it. Apparently there are more than sixteen-million colours to choose from - that seems like more than you really need. There's red, so that's the main thing.

There are two other methods to control the Hexagons; via your virtual assistant or by touching the panels themselves. I use Alexa to access most of my smart devices and it communicates with the Shapes very well. I've even created a routine that turns the Hexagons on when a motion detector sees someone enter the room. Google Assistant, IFTTT and Siri are all options too and using HomeKit on your Apple devices will let you activate personalised scenes that involve any of your Homekit-enabled gadgets by touching certain panels.

There are also five programmable Touch Gestures that let you access some of the more basic settings with swipes or taps on the panels themselves. When it comes to customisations, this is certainly one of the most malleable tech toys I've ever encountered. Not only can you physically adapt it to fit your environment (even bending around corners using optional flex-linkers) but there are so many programmable options controlled in so many different ways.

My main criticism is to do with the lights themselves. Yes, you can have them bright or dim or even automatically adjusting to the light conditions in the room but they don't light up right to the corners of each panel. This makes the illuminated area more of a circle than a hexagon. Additionally, as you can see in this picture, the light is slightly shaded in certain areas too. Neither of these things are particularly obvious, especially from a distance, but it might be something Nanoleaf can perfect for future Shapes.

In the meantime, this is certainly one of the more creative ways to light up a wall, either at home or perhaps even more effectively, at your place of business. All too often we're told we're only limited by our imaginations but in the case of the Nanoleaf Shapes Hexagons, that really does seem to be the case. Whatever physical form you choose, in whatever colour and pattern, controlled by button, touch, app or voice. I can't wait to see what the next Shape will be...


Click here for more information on Nanoleaf Shapes Hexagons.

Click here for pricing options.

Saturday, 25 July 2020

SMARTER WIFI MEANS BETTER WIFI

If you're still struggling with your home WiFi setup, there are any number of steps you can take to remedy the situation.

Yes, there are extenders or mesh-router systems you can try. These will certainly help with any coverage issues you might be dealing with but if you're experiencing slow speeds, dropouts, buffering, this isn't necessarily because of a weak signal.

If you have a lot of IoT devices, smart speakers, WiFi cameras or just a lot of people in the house all trying to be online at once, things are probably getting pretty crowded at your router.

It's like expecting to get a more powerful flow from your hose if you only have the tap half-on.

WiFi-6 is one way to get things moving...


As the ultimate example of, "Looks can be deceiving," the D-Link DIR-X1560 is a pretty inconspicuous little thing - and I do mean little. Apart from the four external antennae, this router is one of the most compact I've come across in the D-Link stable, making it easy to tuck away somewhere subtle. Like other recent D-Link devices, there's also the option to turn off the status LED's once you've got it all set up, really helping make the DIR-X1560 as invisible as possible.

In terms of installation, this was undoubtedly the most hassle-free setup I've ever experienced on any router. Well, almost. I tried to do it with the D-Link WiFi app initially but when I couldn't get it to work first time I simply connected my phone to the DIR-X1560 by scanning the QR code on the base. At that point I was able to open the browser-based setup window which includes an easy-to-follow, step-by-step connection wizard. Settings like WiFi passwords were saved quickly and efficiently - I was up and running in about ninety seconds - I think that's a record for any router I've used so far. Or maybe I'm just getting better at it.

Despite its minimal footprint, this is an exciting piece of connectivity because it's one of the first WiFi-6 routers on the market. This makes it ready to handle the increasing number of smart devices you're no doubt bringing into the house, many of which require stable, fast, 24/7 WiFi connectivity. Security sensors and cameras aren't much use if they can't react instantly when triggered. Smart speakers aren't very smart unless they're always waiting to respond to your next command. WiFi-6 means a significant leap in capacity and bandwidth so it can deal with many devices simultaneously.

To facilitate this further, D-Link routers have been using MU-MIMO technology for some time now, which intelligently allocates bandwidth to multiple devices so everybody gets the most powerful connection possible. The DIR-X1560 now reduces congestion even further by using a new standard called Orthogonal Frequency Division Multiple Access (thankfully abbreviated to OFDMA). Somehow this allows the signals from many devices to be transmitted all at once instead of queuing up, meaning a quadruple boost in bandwidth capacity - music to the ears of anyone with an online gamer in the house. Now your video streaming won't be left to buffer at the expense of their First-Person-Shooter.

There are a host of other techy tricks I could get into but the upshot is, this router is all about allocating enough internet access for every gadget that needs it. Interestingly, in terms of actual coverage, I've found the signal is not necessarily more powerful than other similar routers I've used in the past but I've discovered even when I connect at the weaker edges of its coverage area, the linked device still seems to perform reliably, presumably due to all these new advances built in.

The DIR-X1560 is also part of D-Link's EXO range, which means you can create a mesh WiFi network with compatible EXO extenders. A small caveat here though; when I tried doing this with the DAP-1820 extender, it worked well with most of my devices but I had major issues with my Alexa enabled multi-room speaker system. I don't know for sure, but I think this may be due to the fact the DAP-1820 is not WiFi-6 enabled and the speakers seemed to think they were split between two different networks even though the SSID was the same. I'd like to try it again with D-Link's new WiFi-6 extender, the DAP-X1870, but that doesn't seem to be available here yet. The good news is, when I unplugged my extender, there was enough coverage from the DIR-X1560 to connect all my speakers anyway and everything started working much better.

And that seems to be the beauty of the DIR-X1560; as long as you can connect to it, even a couple of rooms away, the result is still pretty good.

My only real beef with this device is the lack of a USB port. This means I can't set up a media server on my network like I'm used to - there are still four 10/100/1000Mbps gigabit ethernet ports but no USB which is a bit frustrating. Maybe I'm asking too much from such a reasonably priced router - after all, it still offers other premium features like a customisable firewall and QoS (Quality of Service) that let's you manually prioritise connected devices.

If connecting a USB drive for network storage isn't a priority for you, then the DIR-X1560 offers (and delivers) a lot of future-proofed new features for the money, in a small package.


Click here for more information and pricing on the D-Link DIR-X1560 smart WiFi-6 router.

Saturday, 18 July 2020

AT LAST, SOME DECENT COMPUTER SPEAKERS

When I first bought a desktop computer, it was a very exciting experience.

Somehow, I don't remember how, but somehow I ordered it. I feel like I ordered it online but that can't be right because I didn't have a computer yet.

Maybe I went to a shop.

Yes, that must be what happened. I actually went to a shop and chose the kind of computer I wanted sent to me and waited for it to be delivered.

I vaguely remember a big box - maybe several big boxes - full of smaller boxes. Remember, this was my first PC so I needed everything; monitor, keyboard, mouse, the desktop tower itself and two speakers.

I recall being quite impressed by the speakers, that creamy beige colour all computer stuff seemed to be in those days. They were small but heavy and they sounded really good.

Not that I can remember what I was actually playing through them... this was way before Spotify or YouTube. Even before iTunes. My computer had a CD-ROM drive, so I suppose it was possible I was playing actual CD's. I know that sounds crazy but it seems right.

Or I might be wrong about all of that. I don't have a very good memory.

The point is, I'm still using those speakers today. They're the only part of that original setup to survive the craziest two decades of technological developments the world has ever known.

But now, at last, it might be time for an upgrade...


The Quantum Duo is part of JBL's new range of gaming audio devices. While headsets make up most of the range, I certainly appreciate the option of a speaker setup. I wear headphones all day at work so I'm keen to give my ears a break when I get home.

Appearance-wise, while the general aesthetic is undoubtedly gamer-centric, I don't think it's too over-the-top. There's a combination of matte and glossy panels and stripes which are actually relatively subtle, given they're all in black. There are, of course, the obligatory RGB lighting options and I'll have more on that later but what I really like is how narrow the Quantum Duo speakers are - just 89mm across - so they won't take up too much extra desk space.

The cable that connects the two speakers together is a very generous two metres long, surely enough to stretch behind even the widest of gaming monitors (or dual monitor setups). This is hardwired into the right-hand speaker and connects to the left-hand one via USB-C. That's confusing to me because the USB cable that connects to your PC is a USB-A to microUSB. Not a biggie but it's just so much easier to plug in a cable that doesn't matter which way up it goes in.

In fact, there are three ways to connect the Quantum Duo to your source device; USB, AUX cable or bluetooth. The method you choose will obviously depend a little bit on what you're playing from. In terms of sound quality I didn't notice a massive difference between each connection - even bluetooth provided a clear, powerful result although it was no use for audio editing. This is because there's a slight delay when going from no sound to playing. There'll be a technical reason for this and it's not the same as the audio lag you can experience on some devices which can make gaming and watching video frustrating - I didn't really notice much of that sort of lag at all. Instead this is more like water coming out of a hose; every time I pushed play in Adobe Audition it would take half a second for the sound to come through. No such issues while gaming though, I guess because there's always music and effects.

Another difference between connection methods is what the volume control knob on the right-hand speaker does. When connected via USB or bluetooth, this syncs with your PC volume so adjusting it on either device does the same thing. Because no digital information is exchanged via the AUX cable, you'll probably want to turn the volume on your PC all the way up and then make any adjustments after that on the speaker. I found the AUX connection simply didn't play as loud either.

And believe me, the Quantum Duo can definitely play loud. Although this is designed to be part of a gaming rig, there's nothing stopping you connecting it to your PC via USB and then pairing your phone via bluetooth to pump out your favourite music playlists. I've just been having a listen to the latest Black Eyed Peas album and in JBL's usual style, the bass response is pretty epic - even though the speakers really aren't that big.

Each speaker sports a 2.5" woofer with a 0.75" tweeter and the system is rated at 20W - which is definitely plenty if you're using it in a bedroom or study. It's not just all about that bass, either. In the past I've been critical of other JBL speakers for sacrificing clarity in higher frequencies, especially in the mid-range, in favour of a big, crowd-pleasing bass thump. This time though the balance is good, with vocals and acoustic instruments cutting through quite well.

Of course, the question is; can speakers provide the kind of accurate surround sound required to sense your enemies creeping up on you in your next online battle? After all, as JBL's marketing slogan for the Quantum range suggests, "Sound is Survival."

Given this is a simple, two piece speaker array, designed to be positioned on either side of your monitor, the obvious answer is, no. If you don't have rear speakers, it doesn't really matter how much auditory engineering genius has gone into the design, there's only so much that can be achieved in terms of a full, surround soundscape. And yet... there's a discernable space and roominess here, especially when you activate the surround sound mode - just one of many controls to be found on the right-hand speaker.

By roominess I don't mean boominess either. The result is much more a case of there being space for each sound effect to be heard clearly above the soundtrack, so while there's not necessarily sound coming from behind you, it's most certainly room-filling.

The only area I feel the Quantum Duo comes up short is in terms of customisation. Many of JBL's new Quantum headsets can be fine-tuned via the QuantumENGINE app. This allows you to adjust EQ's, surround sound settings and RGB lighting effects. Unfortunately, the Quantum Duo is not controlled by QuantumENGINE, even when connected with the USB cable. This means you're pretty much stuck with the default EQ JBL's audio engineers have decided on. It also means cycling through three different controls on the right-hand speaker to set the RGB lighting to your preference, adjusting pattern, colour and brightness. This still provides a lot of options although I struggled to find a bright red colour, having to settle for pink or orange instead.

Perhaps there's an even fuller-featured Quantum speaker system to come that will offer more digital controls. In the meantime, the Duo certainly delivers in terms of sound quality, clarity, accurate effects and sheer power. If you're still using the same PC speakers you bought twenty years ago, this is certainly a tasty upgrade.


Click here for more information on the JBL Quantum Duo PC gaming speakers.