Friday, 20 December 2024

Norton Financial Monitoring - Yet Another String In 360's Bow

At the risk of sounding a bit grinchy, this time of year is when you're at greatest risk of online crime. Every online shopping transaction is an opportunity for bad actors to finagle their way into your cyber affairs, potentially swooping in to grab your personal details, security codes, bank logins and credit card information.

It's already a stressful time for many people and the last thing you need is discover some lowlife has snuck in and drained your account.

Or even worse, discovering someone close to you - perhaps an elderly or vulnerable relative - hasn't quite got the digital literacy to look out for suspicious activity online. In these cases, their stress can become your stress pretty quickly.

Now Norton has come up with a way to take some of that holiday stress away.


Financial Monitoring is a new feature under the Identity Protection section of any Norton 360 Platinum or Norton 360 Advanced subscription.

Once you're subscribed, you'll find the Financial Monitoring tab in the Identity Protection section. Here you can link to your bank accounts, credit cards, investments and loans.

Ironically, I found the setup process kind of scary. Although I knew (and double-checked) I had logged in to my account via the official Norton website, these days I'm always pretty reluctant to input sensitive information like bank logins. You can bet I was keeping a close eye on my accounts on another screen just to make sure this wasn't some kind of extremely elaborate scam.

I'm not sure how Norton could get around this nervousness - how the process of linking to your most critical financial details could feel safer.

However, in the interests of exploring the experience on your behalf, Dear Reader, I took the plunge and carried on.

All major New Zealand banks and lending institutions seemed to be represented and I had no issue completing the process.

Once I had, I could then access a summary of my account activity from any device I had installed Norton 360 Advanced onto. Although this part of proceedings isn't that different from logging onto a specific banking app, if you have multiple dealings with a collection of different financial institutions, this is certainly a great way to see all the comings and goings at a glance.

But the real peace of mind comes from the notifications Norton sends out if it detects any unusual activity. 

I'm no big-noter so it's not every day I go out and make multi-hundred dollar purchases. While you can set the threshold for an "unusual transaction" wherever you want, I decided to go for the lowest possible option, $100 for cash withdrawals, purchases and transfers.

Sure enough, when I spent an eye-watering amount at the supermarket yesterday, doing a pre-Christmas shop, I was notified shortly after about my suspicious purchase. At this point you can choose to ignore it or follow up if you don't recognise the transaction.

And just like that I suddenly had the confidence to shop online without being quite so paranoid. Given the angry, shouting woman at the self-service checkout next to me at the supermarket, it might be time to give online grocery shopping a go.

The downside is there's a bit of a delay between the transaction and the notification - but I assume that's actually the delay between me making the purchase and the digital funds literally changing hands. We've all seen how that process can sometimes take days for no explicable reason.

So taking that into account (excuse the pun) I'm now pretty optimistic Norton's Financial Monitoring service will be able to alert me to anything weird before I wake up one morning to discover I'm now a another penniless victim of online fraud. That certainly wouldn't be ideal Christmas morning - or any other morning for that matter.

It's also potentially a fantastic way to prevent the people close to you - be they elderly or just starting out - making a naïve mistake that could cost hundreds, if not thousands.

I've trusted Norton to protect my devices and my identity for years and it hasn't let me down yet. Now it's nice to know Norton is standing outside my virtual bank vault for extra security as well.


Click here for more information on Norton 360 Advanced.

Monday, 16 December 2024

JBL PartyLight Beam and JBL PartyLight Stick - Pair Some Sight with Your Sound

When it comes to heritage brands in tech, JBL is right up there.

Decade after decade, professionals and consumers alike have turned to JBL for fantastic sound solutions and in the age of portable and Bluetooth speakers, JBL has come to the party every time. Literally.

While the resulting sound performance has always exceeded expectations, I don't think anyone ever bought a JBL PartyBox specifically for its dazzling light show. 

Now, recognising it's fun to add a bit of light and colour to proceedings, JBL has taken things in a new direction.

This is the first time I've reviewed any JBL device that doesn't play music.


If the PartyLight Beam and PartyLight Stick are anything to go by, it certainly won't be the last.

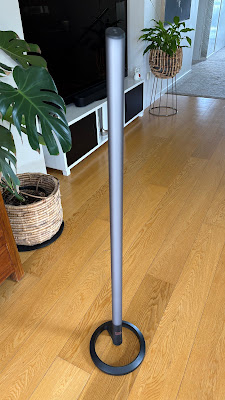
The first thing I love about these two devices is there's nothing particularly fiddly about them. The Stick couldn't be easier to assemble; you literally just twist and click the LED light tube into place on its stand, while the Beam requires no assembly at all.

The Stick comes with a USB-C charging cable in the box but no wall charger, so it's assumed you'll already have one of those lying around. It'll take up to 3 hours to fully charge the 9.0Wh lithium-ion battery which should then give you about 8 hours of continuous use.

Both lights are easy to pair, using the JBL PartyBox app. Although you don't actually need the app to use them, it is recommended you check for any firmware updates before you do. These updates take an annoyingly long time to download and install, presumably because you're only connected to your phone or tablet via bluetooth. Take my advice, don't try and install an update 5 minutes before your guests are due to arrive.

Once that's over and done with though, the rest is easy.

AFter you've plugged it in, the Beam is powered on by tilting it up to face your preferred direction. The Stick has a power button, which causes a section of colour to rise up its tube like a light-sabre, before briefly showing you how much charge is left with a white-on-black indication.

Both Stick and Beam have built-in mics and using JBL's algorithm, they listen to whatever music's playing and react accordingly.

The Stick creates all kinds of mesmerising effects, sending shafts of different colours up and down the tube at various speeds, while the Beam combines two different, extremely bright, rotating LED spotlights to project an infinite combination of colours and patterns onto your wall or ceiling.

That's fun but it's a bit random - especially if you're using both devices together like I am for this review.

Using the PartyBox app, you can customise the colours and patterns exactly the way you want but the real fireworks start when you add a JBL PartyBox into the equation.

One caveat here; it'll need to be a relatively up-to-date PartyBox - because we're about to make use of the Auracast function.

I've talked about Auracast in my recent JBL speaker reviews. It's the latest protocol JBL has adopted to link multiple speakers together so they can create a louder, more powerful sound system.

The reason the new PartyLights also have an Auracast button is to connect and sync with a speaker like the PartyBox Stage 320 I reviewed back in May. These JBL speakers put on quite a cool light show of their own, although as I said in my introduction, it's kind of limited.

Now, with a press of the Auracast button, not only will any PartyLight devices be in sync with each other, they'll also match what's happening behind the grille of the speaker (or speakers).

This instantly makes your light show look far more professional, matching the tone and beat of the music with similar colours and effects. The Beam casts very bright patterns indeed, rated to light up a 40sq/m room with ease, while the Stick is uniquely designed to cast its effects in a full 360° array.

And unlike the Beam, the Stick also has the advantage of being completely portable, so there's nothing stopping you taking the party outside - especially if you've paired it with a rechargeable speaker like the PartyBox Club 120 I used for this review.

I've often talked about my disdain for pointless flashing lights on gadgets in the past - including perhaps the token light displays manufacturers like JBL insist on building into their speakers.

However...

By adding one or more devices from the new PartyLight range and syncing them up through Auracast, suddenly it all starts to make a lot more sense. The colours and patterns being projected by either the Beam or the Stick (or in my case, Beam combined with a pair of Sticks) now mimic the PartyBox speaker's display exactly.

Unfortunately, despite how universally all JBL's Auracast speakers connect together, no matter what size or model, only the PartyBox speakers with Auracast will sync with the PartyLights and sadly, if you have an older, non-Auracast PartyBox, you'll just have to rely on the PartyLights' built-in microphones to put on the show for you.

Either way these are a quick and easy way to bring a professional standard of lighting to your party - or perhaps even your gig if you're using a PartyBox or two as a P.A. What's more, they're durable, easy to move about and are pretty reasonably priced too. Why hire lights for your next function when JBL has come up with a fun, affordable solution you can own yourself?


Click here for more information and pricing on the JBL PartyLight Bean.


Click here for more information and pricing on the JBL PartyLight Stick.

Sunday, 15 December 2024

blink mini 2 and blink outdoor 4 - Don't Pay Too Much for Home Security

When it comes to installing a security camera or two at your place, it's easy to get carried away.

A high-quality, weather-proof camera can set you back hundreds. Then, once installed, all too often you'll be stung a second time with a subscription to keep accessing the more advanced features.

Once you've spent all that money, maybe it would have been cheaper to let the burglars in and just take their pick.

The good news is - especially at this time of year - you don't have to shell out top dollar for a reasonable home monitoring solution.


From October this year, Amazon-owned Blink arrived in New Zealand in force with its latest devices, the Mini 2 and Outdoor 4. The Mini 4 offers the versatility of working either indoors or outside while the wireless Outdoor 4 promises up to two years use on a single pair of AA batteries.

Both cameras are available in white or black and both are extremely compact, although obviously the Mini 2 is particularly tiny. This makes them a good solution for those of us who prefer a more subtle approach to home security in terms of aesthetics. If you want a big, bold, in-your-face camera that shouts, "Take your chances, crims! Can't you see you're being recorded?" these Bink cams might not be the answer. On the other hand, if you'd rather not have cameras detracting from the look of your lovely home, these little beauties can be easily tucked away somewhere less obtrusive.

Both cameras come with equally petite mounts, which can be adapted for wall or ceiling installation. While these mounts are certainly versatile, they're pretty much entirely plastic and I wonder about durability over time - not that I've had any issues yet. My other concern is how the cameras simply snap onto the mount with a click. This makes for easy installation but presumably it would also make for easy theft if a baddie wanted to make off with your camera. Luckily, no video footage is stored on the devices themselves so at least the last image you got would be a closeup of the thief!

Let's talk storage, while we're here. Just like most other brands, Blink makes you subscribe to a monthly plan if you want to use their cloud storage option. Videos are saved for 60 days and it's easy to watch and share them. However, unlike some of Blink's competitors, there's another option.

The Outdoor 4 camera is boxed up with the Sync Module 2. As with many other smart home devices, instead of connecting directly to your Wi-Fi network, you use the Blink app to set up the Sync Module 2 first. This is very quick and easy and it then benefits you in three ways. Firstly, by locating the Sync Module 2 in your house, somewhere close to your outdoor cameras, you'll get improved connectivity, as Wi-Fi routers are often situated a long way away from outside, let alone where you want your cameras to be.

Secondly, connecting several cameras through a module like this means less traffic on your home network overall, which should always be your goal.

Thirdly - and this is the clincher - the Sync Module 2 has a USB-A slot to plug in an external storage drive. This means you can store your vids locally for free, even after the 30 day trial of the Blink subscription plan runs out.

The crazy thing is, the module is absolutely tiny - so it's easily stashed away behind or under furniture.

The Blink Mini 2 isn't bundled with a Sync Module and as such can just work as a standalone Wi-Fi camera - but if you're planning on using several or you want to take advantage of that local storage option, the Sync Module is the way to go and of course, you can buy them separately.

Another optional extra you may want to consider is the Weather Resistant Power Adaptor - a four-metre cord (complete with cable tidies and installation screws) that's compatible with both the Mini 2 and the Outdoor 4, if you prefer to run it off the mains, rather than on battery. This is certainly a sturdy cable and the USB-C connection to the camera is impressively rubberised to keep any moisture out. However, because the USB-C slot on the camera is extra deep in order to accomodate the weather-proof plug, I found it very fiddly to push it in at just the right angle to ensure the USB-C part of the plug actually slid in. It took me several attempts and caused quite a bit of frustration when I kept checking the app only to discover the Mini 2 still wasn't powered up and ready for pairing.

However, I got there in the end. In terms of operation, I found the cameras work in much the same way as most others I have tried. The app provides clear, wide angled footage from both cameras and the sound quality to be excellent. You also have the option to speak out of the cameras from your phone - scaring off undesirables or welcoming visitors perhaps.

The Mini 2 features a surprisingly powerful LED floodlight. This can be triggered automatically or manually via the app and it means you'll get a clear, colour HD feed, even at night. Conversely, the Outdoor 4 reverts to black-and-white infrared after dark - still perfectly clear though.

As you would expect, you can set up motion notifications to appear on your phone and being an Amazon-integrated product, you can view feeds from Blink cameras on Echo Show and Fire TV devices or set up other Alexa smart home routines to be fired off when either camera is activated. You can customise Motion Zones quite accurately or alternatively, set up Privacy Zones where the camera won't look.

There are other features, apart from cloud storage, you can only utilise through a subscription plan. These include person detection, extended live viewing and what Blink calls "Moments" - which is a compilation of videos saved into one longer clip.

Starting from NZ$5 a month, the Blink subs are similar to others out there but there are definitely savings to be made with the purchase price on the cameras themselves and their associated accessories.

The Mini 2 and Outdoor 4 are easy to set up and generally speaking, they do the same job any other camera does, yet they're probably cheaper - especially when Amazon is having one of its frequent sales. I'm not 100% convinced of their durability long-term, although really the only thing I'm basing that on is the plasticky feel of the mounting hardware. I certainly haven't experienced any issues and thanks to the Sync Module 2, connectivity is first rate.

If indeed the Outdoor 4 runs for two years on a single set of batteries, that alone has gotta be worth a try.


Click here for more information and pricing on the blink mini 2.


Click here for more information and priocing on the blink outdoor 4.