Tuesday, 31 May 2022

Sonos Still Holds the Crown

I still remember my excitement when I installed my first piece of Sonos gear. I was pretty late to the party; so many people had told me about their amazing Sonos setups - raving  about their crazy good soundbars and seamless multi-room audio.

I kept hearing Americans advertising Sonos products on podcasts - everyone seemed unanimous in their effusive praise for the brand. Suspiciously so... surely there was no way the real deal could live up to the hype?

But then I got my own; a Sonos Arc sound bar teamed with a pair of One SL surrounds. Oh boy, turned out they were right. All of them. 

An elegant, streamlined, wireless home theatre that sounded... well... sensational. The power. The dynamic range. The 3D effects. I was in aural ecstasy. I had arrived.

Given it was the original Sonos Beam soundbar that really propelled Sonos into the stratosphere of home sound solutions back in 2018, obviously I was keen to try out the new version as soon as possible. Then, almost out of nowhere, there came an even more budget-friendly option.

So why not give them both a go? All research is useful research, right?


Compared to my Arc, both the Beam (Gen 2) and the all new Ray are just babies. At about 65cm long for the Beam and only 56cm for the Ray, either of these soundbars will fit into spaces the somewhat oversized Arc never could.

Like the Arc, the new devices are available in both black and white and whereas the original Beam was covered in a fabric mesh, the grilles on these soundbars are a much more durable and easy-care, precision-cut polycarbonate.

While the Beam retains its traditional long-box-with-rounded-ends shape, the front of the Ray splays out in a more trapezoid fashion. The major differences are internal, of course. The Beam boasts five amplifiers versus the Ray's four, although the Ray has two tweeters while the Beam has only one. The Beam has four midwoofers, the Ray just two and the bass is handled quite differently in each device too. Despite these variables, both soundbars sound great but more on that shortly.

There are two more obvious differentiators between these models; only the Beam (Gen 2) offers voice control by linking with Amazon Alexa. For some reason Google Assistant is still not available for Sonos in New Zealand. Come on Google, lift your game. To be fair, Sonos' own Voice Control isn't here yet either.

The other big difference is super weird. The Ray only connects via its included optical cable - no HDMI to be seen. I haven't connected anything with optical for about 15 years and I assumed this technology was on the way out. Luckily, there's an optical cable included in the box. The really odd thing about this is Sonos is marketing the Ray as a way to "Take gaming to the next level..." yet neither the latest Xboxes or PlayStation have optical outputs. This doesn't mean you can't use the Ray for gaming - you just have to get the audio feed from your TV instead. Most TV's do have optical ports and if you're using the Ray as your primary audio component of your home theatre, it's the TV you'll be plugged into anyway. That said, it's a lot more complicated setting up my TV's remote to control the Ray via optical than it is to pair with the Beam via HDMI eARC - but I got there in the end.

Sonos also claims setting up either of these speakers is super simple, just a matter of following the steps on the Sonos app. That's kind of true, although many speakers just work when you plug them in and turn them on. The difference here is what makes a Sonos system so superior; Wi-Fi connectivity means reliable, room-to-room control. There are also a host of fine-tuning features in the app you just won't find with other systems - for example, you can adjust the height of your soundscape on the Beam and both speakers offer Trueplay tuning if you have an iOS device. This is a way to teach your soundbar the unique audio characteristics of your room so stereo and other effects can be played accordingly.

Like any Sonos speaker, once you've added the Ray or Beam to your Sonos profile, you can then choose to stream from any of your connected services, or play different things on different speakers if you prefer. The wonder of wireless home audio is literally in your hands. This is where the Beam's voice assistant abilities give it quite the advantage, as you don't even need your phone to control it.

Without getting too bogged down in sound-nerd tech specs, both these soundbars produce top quality audio - I mean, you'd expect no less from Sonos, I've certainly never been disappointed. While you might not consider a soundbar as your first choice for music reproduction, these are both great options - the size and number of speakers in each device almost certainly outpaces your bog-standard bluetooth box.

Then once you get to movie time (or TV time or yes, even gaming time) again Sonos definitely delivers. If you're looking for depth, height and convincing stereo separation, both the Beam (Gen 2) and the Ray really come to the party. I expected no less from the Beam, given its predecessor's acclaimed reputation but I've been just as impressed by the smaller (and significantly cheaper) Ray. I even hid it behind my TV, just to see how that would effect things and it still sounded great.

Neither device offers bone-shuddering bass response - the bass is there, it just won't rattle the windows (or bother the neighbours, for that matter). However, there's nothing stopping you adding the Sonos Sub to your system - although that alone costs more than the Beam and Ray combined.

You also have the option to add a pair of One SL surround speakers to complete your home theatre experience. If you can stretch the budget, I'd definitely recommend this to get the most out of your new system. When it comes to Sonos, the more speakers the better.

While there's no doubt the new, improved Beam is a superior speaker to the Ray, especially given its extra features and more user-friendly HDMI eARC connectivity, to my ears, the difference in out-and-out sound performance is not as dramatic as you might expect. This makes the NZ$449.00 Ray exceptional buying and the money you save might be better spent on a sub or surrounds.

Either way, I'm sure you'll be just as excited as I was when you get that box (or those boxes) home and finally experience some Sonos for yourself.


Click here for more information and pricing on the Sonos Beam (Gen 2).


Click here for more information and pricing on the Sonos Ray.

Sunday, 29 May 2022

Looking Cool Goes a Long Way

This is going to be another one of those reviews that starts with me explaining how under-qualified I am to write it.

If you were mean-spirited, you might suggest that probably applies to most of my articles but I'd argue I have a reasonable knowledge about some things; smart phones for example. Earbuds, definitely. But bicycles? Not so much.

Still... my philosophy is if you can plug it in, it's a gadget. If it's tech, I want it.

And when I saw this particular piece of tech, I really wanted it.


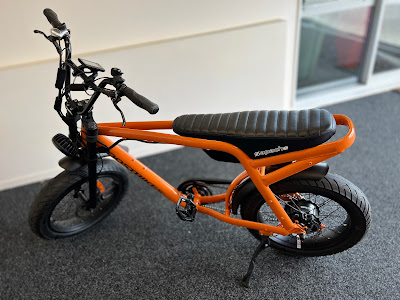
Based loosely on the Chopper-style bikes of yesteryear, the BoostBikes Apache is not your conventional eBike. Whether you choose Gloss Grey, Matt Black or Gloss Orange, this is guaranteed to be a head-turner - and not just because it can get you up a hill without pedalling.

From the low-rider styling to the motorcycle-like seat to the chunky handlebars, everything about the Apache has been crafted for coolness.

As a result, casual observers may not even realise this is an eBike at first. The 48V 16.5Ah lithium-ion battery is not massive and it slides snugly under the oversized seat, almost obscured from view. As for the 500W rear-mounted electric motor, I'm always amazed at how compact these things can be and this one is no exception. If it wasn't for the slight electrical hum that kicks in when using pedal assist, onlookers could be forgiven for missing the electric part of this bike altogether.

While it is possible to pedal it without any motorised assistance at all, it's quite an effort; remember, the Apache does weigh in at 27 kilos. That's still light enough to be loaded onto a standard back-rack though (as long as it's a pretty solid one). I also had no issues maneuvering it around in my garage - despite being endearingly chunky, it's also compact so quite easy store.

As far as gadgets go, the Apache is definitely one of the more straight-forward ones to get your head around. There's a small controller for the LCD display mounted next to the left hand-grip. You turn the bike on with a long press of the central power button, then it's simply a matter of adjusting the five levels of pedal assist with the up and down controls.

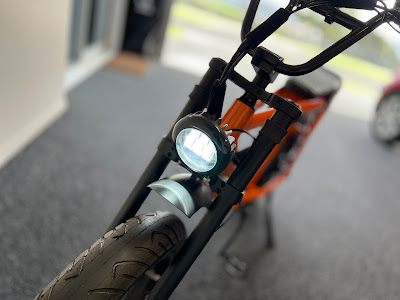
There's also a red button on the left-hand side to turn the large headlight on (this switches on the tail-light as well, although that comes on automatically when you use the brakes too).

There's a similar red button adjacent to the right hand-grip. This activates the throttle which works just like one on a motorbike handle - in fact, at this point, the Apache works just like a motorbike. While there are seven manual Shimano gears available, thanks to the electric pedal assist I've left it in high gear the whole time.

Even when crossing busy intersections, that power boost kicks in pretty much as soon as you start pedalling so I've never felt the need to change down a gear, regardless of the terrain.

That's not to say this is an all-powerful beast that straightens curves and flattens hills. In fact, the first time I took it out it was extremely windy and if I was pedalling uphill into a stiff head-on breeze, I struggled to squeeze much more than about 15km/h out of the Apache - a far cry from the 40km/h maximum speed listed on the website. However, downhill with the wind at my back, I could exceed that 40km/h easily - and felt very comfortable reclining back on that big, wide seat in the process.

An extra $140.00 gets you a front fork suspension upgrade which I'd definitely recommend if you're considering riding the Apache anywhere other than the street or on cycleways. In fact, there's every reason to try a little off-road action - the 20" x 4" fat tyres provide excellent stability and traction - I was only using the slick street versions but there's a knobblier all-terrain option if you're determined to give paved surfaces a miss.

After riding it around for a week or so I'm starting to get a real feel for what this bike is all about - and what it's not. The range is listed from 25-50km but of course that's so variable depending on how much pedalling you're doing as opposed to how much you rely solely on the electric motor. I'd certainly be a little nervous about a long commute, although the battery does charge in just a few hours using the supplied fast charger which plugs in just as easily as a phone charger does.

The Apache probably isn't going to win any speed prizes either - but I don't think that's a surprise, it's not exactly built like a racing bike and to be honest, there comes a point where an eBike becomes an electric motorbike. That kind of power and speed means more risk in terms of road safety too - this bike stops just short of that and therefore keeps things fun.

Ultimately, that's the word that keeps coming to mind; fun. It looks fun, it's fun to ride and yes, it's fun to see people seeing me ride it. While some things about this bike are practical - the big, go anywhere tyres for example - some things are totally whimsical; there's nothing logical about a seat that's almost too wide to comfortably pedal from - but who cares?

Starting at NZ$3290.00, the Apache is a fairly expensive toy and make no mistake, that's exactly what it is; a toy. However, surely most of us would like an expensive toy or two if we could afford them - especially one as well crafted as this one.


Click here for more information and pricing on the BoostBikes Apache.

Wednesday, 25 May 2022

No More Printing Pain Points

How many people do you think would say they love their printer?

Nope, didn't think so. When it comes to tech frustration, few machines are capable of causing the acute psychological distress a printer can.

From paper jams to ink replacement, or my personal favourite; simply disappearing from your list of preferred devices, sometimes it seems printers were sent to try us by the very devil himself.

All of this is exacerbated by the fact printers often let us down just when we need them the most... the night before the assignment is due... when you'd been working on that photo collage for Nana's birthday or worst of all... when you need to print, sign and scan official documents - potentially putting important business transactions at risk.

When you think about it. it's all about reliability. Why can't printers just work?


The new HP ENVY Inspire All-in-One printer series just works. This week I've been trying out the ENVY Inspire 7921e and by all early signs so far, I'm impressed.

Aesthetically, there's nothing groundbreaking about this printer, although I do like the contrasting colours on the document feeder and the paper tray - I'm very relieved HP sent me the Surf Blue version and not the Portobello option. Portobello may suggest a mushroomy hue but it still looks beige to me. Just saying. 

Whichever colour you opt for, if you're environmentally responsible, you'll be pleased to know HP is doing its bit too. Not only are the new 7900 and 7200 series All-in-Ones constructed from 45% recycled plastic but for every page printed using an HP+ printer, HP has pledged to restore forests in equal measure - even sourcing its paper exclusively from "responsibly managed forests."

Anyway, the 7921e is on the larger side for a home printer but this is due mostly to the aforementioned document feeder. I've had printers both with and without feeders and it wasn't until I went without I realised I really prefer with. There's something satisfying about the set-it-and-forget-it process of plonking multiple pages into the top of the printer, simply pushing the scan button on your computer and coming back to an automatically compiled, multi-page PDF sitting in your designated folder when it's finished. I've decided that's a must-have feature for me.

I also appreciate a full-colour control screen. Again, I've used printers with no screen at all - just a few buttons that sometimes have multiple functions assigned to them. This can obviously get confusing quickly - especially if you can't remember what the little symbols are supposed to mean. A touch screen like the one on the 7921e is much more user-friendly - in fact you can tilt it up to face you. Pretty much all options are accessible from the scrollable menus and shortcuts on this screen - and you can even create your own shortcuts using the app.

Yes, of course there's an app; HP Smart. This is how you'll set the printer up in the first place and don't be scared, it's a very simple, guided process that's probably the most complicated thing you'll have to do with this printer. The most important step is joining your Wi-Fi network and as a mentioned at the top; connecting your printer to the Wi-Fi and keeping your printer connected aren't always the same two things. However, thanks to some pretty whizzy self-healing Wi-Fi tech, somehow HP has managed to get these new ENVY Inspire devices to connect and STAY THERE. Yay.

It gets better. These are HP+ printers. HP+ is more than just a fancy warranty; once registered you'll get a year of online support and the ability to access your printer from anywhere and from any device - either at home or out and about. You can even do things like scan to your phone, which could definitely come in handy if you've left important documents at home or maybe you need an instruction manual - perhaps a piece of music? Who knows?

But perhaps the most compelling reason to go with one of these new ENVY Inspire All-In-Ones is Instant Ink. I've talked about Instant Ink before but it's a good enough service to warrant another mention. Just by buying a 7900e or 7200e printer, you'll get a six month Smart Ink subscription for free. 

This means your printer will monitor its ink supply levels and order replacement cartridges to be delivered to your door. Although your printer comes with a couple of "Welcome" cartridges to get you going, within a couple of days of activating your Smart Ink account, an Instant Ink box will turn up at your door with two new, high-volume replacement cartridges. The monthly subscription charges vary depending on your usage and obviously six months is plenty of time for you to figure out which plan you should be on.

The good news is, it works out significantly cheaper; as much as half the price of buying your cartridges retail and you can't beat the convenience of prompt home delivery. I've been doing it for over a year now and I absolutely love it. I wonder if we can get them do an Instant Paper option too?

Speaking of which, another nifty feature on the 7921e is its dual paper trays - there's a separate tray for photo paper tucked in above the standard A4 tray. This is fantastic as it saves you the laborious process of emptying the tray of one kind of paper, putting the other in, then trying to explain to the printer which sort of paper you've just inserted.

If you've ever printed photos at home, you know exactly what I'm talking about and you're probably jealous knowing I now never have to go through that again.

The last thing I wanted to mention is a silly little thing but it's just one more way this printer is better than those I've used before. The power button is on the front. I know that sounds dumb but previous HP models I've used have had the button at the back, making it almost impossible to find. Our printer lives in the spare room and sometimes guests sleep in that room. That means we don't want power lights glowing in the night and we certainly don't want to risk an accidental print session at the wrong time. The ability to easily turn this thing on and off is a silly but welcome improvement.

The main point of the story is the one we started with; reliability. So far, this ENVY Inspire 7900e series printer has performed flawlessly, scanning, printing or copying to perfection every time. It hasn't disappeared from the home network once and it connects to any device that can download the HP Smart app - even devices that aren't on the same network. And best of all, it never runs out of ink. Ah, all my printer pain gone. Bliss.


Click here for more information on the HP ENVY Inspire 7900e All-in-One Printer series.

Tuesday, 24 May 2022

A Light for Sore Eyes

I'm not really a light-it-all-up kind of guy.

In fact, I'm more of a turn-off-as-many-lights-as-possible guy. So much so, often my colleagues come into the radio studios I've been working in and immediately fire up all the fluoros, instantly causing me to curl up into a defensive, hedgehog-like ball to protect myself from the glare.

Perhaps it's because of the vampirish hours I keep, getting up in the middle of the night to go to work in breakfast radio. After a couple of decades of this unnatural behaviour, maybe I've grown intolerant of bright light, either natural or electric. It might even be a full-blown allergy.

So when I'm at home, it's no surprise you'll often find me roaming the house turning out lights other people (my daughters mainly) have left on in rooms they're no longer in. Actually, that's probably nothing to do with the light, it's probably more to do with having to pay the power bill.

Whatever - my point is I'm usually looking for less light, not more. So the idea of some kind of desk lamp has always seemed like a terrible waste of space for no real benefit.

But what if it didn't take up any desk space at all? Surely then I'd at least have to give it a try...


The BenQ ScreenBar Halo does not look like your average desk lamp. To begin with, it's in two quite separate pieces, the light itself and its wireless controller.

The light, as its name hints, is a slim, 50-centimetre long bar attached to an extremely cunning, adjustable clamp. The unique design of this clamp allows you to attach it to pretty much any monitor you like. Even curved displays are catered for with the included adapter which slots easily into place if required. There's a lot going on here; firstly, the USB-A power cable. The good news is it's a very long cable - 150-centimetres in fact. That should be plenty if you need to plug it into a wall charger or run it off your PC tower down on the floor. The bad news is, if you're using the ScreenBar Halo on a Mac, chances are you've only got USB-C ports to plug it into. This is exactly why I stocked up on USB-A to USB-C adapters a while back; so cheap yet so useful.

Another feature of the clamp is how versatile and easy to install and remove it is. Because it acts as a counterweight, it's padded and it's lightly spring-loaded, it basically just sits atop any screen with no adjustment necessary. Even on my iMac, which has a webcam built in at the very top edge, the front lip of the clamp stops just short of obscuring the view for your video calls. However, if you use an external webcam which also clamps on somehow, that could be a problem and you might have consider BenQ's webcam accessory which lets you mount your webcam to the ScreenBar instead.

Ultimately, the clamp's greatest asset is its large backlight, which is diffused through a special material to provide maximum illumination as softly as possible. The idea here is to light up the wall behind your monitor so there's not such a contrast between your display and its surroundings. This is supposed to help prevent eye fatigue - especially if your workspace is not particularly well lit to begin with. 

The main event is what's happening with the ScreenBar itself, of course. This might be the most adjustable strip of lights I've ever encountered. Obviously you can alter the brightness to suit your preference - the colour temperature too - in fact there are a hundred different levels to choose from. A bit much? Don't say you haven't got options.

The bar can be rotated within its mounting to ensure the lights are not shining in your eyes, only down over your workspace but perhaps the most ingenious aspect of the whole setup is the 2.4GHz wireless controller. There's no pairing involved, you simply install three AAA batteries, replace the magnetic base plate and you're good to go. This ergonomically angled, round controller can be placed anywhere there's space. It sleeps until you hover your hand over the proximity sensor, then you simply wind the edge around one way or the other to adjust brightness and temperature. 

You can cycle through front, rear or both lights on simultaneously and there's even a Favourite button to save your ultimate setup. I prefer to use the Auto dimming button - this hands over control to the ScreenBar Halo's built-in ambient light sensor, adjusting levels to an optimum 500 lux whatever the surrounding conditions.

To sum up, this ain't your grandaddy's desk lamp.

If I've made all this sound techy, geeky and complicated, I assure you that's not the case at all. In fact, the idea here is to set it and forget it. I've been using the ScreenBar Halo day and night for a while now and the only time I notice it is if I forget to turn it on. Because I miss it. I genuinely enjoy having my workspace bathed in this soft, warm, just-right light and there's plenty provided to illuminate my whole desk, so no need to turn on any other overhead lights, even after dark.

Sure it's a nice-to-have rather than a must-have - although if you find yourself rubbing your eyes by the end of the day, this might just provide some welcome ocular relief.


Click here for more information on the BenQ ScreenBar Halo.

Friday, 20 May 2022

Quality Sound Without the Cable

As usual, the hardest thing about choosing a JBL headset is choosing which JBL headset. By my count there are at least nine different options available on the JBL website right now - and that's just the selection of gaming headsets.

This means there is definitely an option to suit your requirements, without question.

Gamers - serious gamers - often worry about going wireless. The primary concerns are are lag and battery life.

It'd be nice to cut that cord though.

So the question is, how much are you prepared to pay to quell your cable-fee anxiety while still achieving a premium soundscape?


If you're looking for a massive change-up from last year's JBL Quantum 600 gaming headset, the Quantum 610 Wireless isn't it. In fact, to look at, most people would struggle to see any difference at all. In fact, in many ways the headsets are indeed identical. This means if you already use the 600, there probably isn't much reason to upgrade... well, there might be one reason but we'll get to that later.

Meanwhile, if you're only just considering a wireless headset for the first time, this is a pretty good place to start.

One thing that has changed this year is the way JBL packages its products. Plastic is out and cardboard is in. Now when you open the box you'll find the headset snuggled into a soft, (and presumably environmentally friendly) material bag - not really for carrying the headset around, just a cool way to keep it safe while in transit.

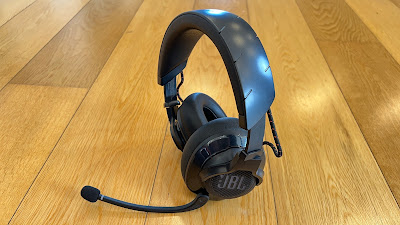
The headset itself is an all-black affair, other than the very-JBL diagonal orange stripes on the wires to each earcup. (There's a programmable RGB element here too - but we'll get to that later as well) Everything is thick, chunky and solid with lots of cushioning - this is not meant to be a multi-purpose headset that doubles as a foldaway commuter device or a lightweight workout wearable for the treadmill at the gym. This is for gaming and that means comfort and durability are key, something the Quantum 610 Wireless absolutely nails in every area. 

At first it felt a little too snug on my massive head but in fact I think this is just a result of how well balanced this device is, distributing its weight very evenly between my head and my ears. The result is the feeling of not much weight at all, quite a trick given how thick and plush the leather-like ear-cushions and headband are. The headband is also quite a bit wider than many other headsets I've worn over the years. This adds to the impression of durability and helps with the weight distribution even more.

I really do have an unusually large skull, yet the extendible arms click out plenty long enough to accommodate it comfortably. I've worn the Quantum 610 Wireless for many hours at a time now and I've experienced no pain or discomfort, even though I wear glasses. The ear-cushions seem to breathe well too - I haven't really felt my enclosed ears heating up even after a long session hunting down dinosaurs in Jurassic World Evolution 2.

In terms of setting up the Quantum 610 Wireless, you don't actually have to. By that, I'm not talking about the fact you can just use the 3.5mm AUX cable that's included in the box - although that's definitely an option. No, I mean you can just plug in the 2.4GHz wireless dongle, switch on the headset (via the only control on the right-hand earcup, an on/off slider) and you should be good to go. There's a "Connect" button on the dongle itself but I didn't need it - the headset was already paired out of the box.

There's a lot you can do with the headset in its default state, thanks to the controls on the left-hand earcup. There's a mic mute button, a volume dial and a game-chat dial, allowing you to mix the level of chat with the level of music and SFX from the game you're playing. However, there's plenty more to the Quantum 610 Wireless than that. Download the JBL QuantumENGINE app and suddenly you have access to dozens of customisations, from EQ and Surround Sound settings to firmware upgrades to RGB controls for the large JBL logos on each earcup.

These lights can be set to any of several preset patterns or you can quickly create your own - flashing on and off, swapping from colour to colour or, as is my preference, leaving them glowing solid red, the best colour of all.

For firmware updates you'll need to connect the headset to your PC via the supplied USB-A to USB-C cable - this is also your charging cable and yes, you can keep using the headset while you charge.

I'm not sure if you'll need to though as JBL claims up to forty hours use on a full charge. This is the big upgrade over the previous model I hinted at earlier. Last year's headset promised just fourteen hours - still plenty for an all night session but if you were frustrated by that, then maybe you should consider the new 610 after all.

Unfortunately, the QuantumENGINE app is only available for PC and as a result the surround sound effects offered by DTS headphone:X and JBL's own QuantumSURROUND won't work on MacOS devices either. However, that doesn't mean you can't use the Quantum 610 Wireless with a Mac - I'm listening to the new Florence + the Machine album on my iMac as I write this. And the good news is any lighting scheme you program for those flashing JBL logos will stick, even when you change devices.

In saying that, PC gaming is where you'll really benefit from the Quantum 610 Wireless' multi-channel soundstage. I've been playing a first-person mystery game called Firewatch, which involves a lot of hiking around a national park using a compass and a map. The directional sound-effects have been a massive help when completing certain tasks, like finding the idiot kids letting off fireworks when they're not supposed to. The benefits of this kind of surround sound have been well documented for shooting and fighting games, especially when trying to co-ordinate team mates versus enemy combatants. But I've also really appreciated how listening can help you find your way in the dark in a game like The Gunk - where there are lot of different paths, caves and obstacles to negotiate in varying light conditions. Sometimes, just stopping and listening is the best way to find out which direction to choose next.

Best of all, thanks to the 2.4Ghz wireless connection, there's no lag whatsoever. Unlike bluetooth headsets (even those boasting the very latest codecs) sound happens in real time. Dialogue looks synced and natural and critical sound effects like gun shots and approaching vehicles come across in real time. I've also found no loss in audio quality either. What's more, the mic quality is impressively clear - no-one will misunderstand your orders in that next firefight.

So the wireless connection is rock solid. The battery life is good for days. The headset is comfy enough to wear for hours at a time. The Quantum 610 Wireless may not be a huge upgrade on the previous model but that doesn't mean it isn't a great gaming headset, definitely worth a look (and a listen) if you're planning to cut the cord.


Click here for more information and pricing on the JBL Quantum 610 Wireless.

Monday, 16 May 2022

Lights Don't Get Much Smarter Than This

There's a reason Philips can get away with charging such a premium for its Hue range of smart lighting. It's the best.

If, like me, you've tried a bunch of other products you could well find yourself in the same smart home mishmash I'm embroiled in; different brands, different quality and perhaps most frustratingly; different virtual assistants.

I literally have to ask three different pretend people if I want to turn on the lights in my dining room, my bedroom and out on my deck all at the same time. How did I get myself into this mess?

At least I can usually remember which virtual assistant is in charge of which lights. Needless to say, the Domestic Manager is not impressed with the arrangement and often asks why we can't just have a switch on the wall like the old days.

She's funny like that.

Anyway...

The more Philips Hue products I use, the more I wish they were all I use - and the latest addition only emphasises that point.


The Philips Hue Play gradient lightstrip is quite a boring-looking thing when you take it out of the box; a fairly featureless white snake with black backing. Available in 55, 65 and 75-inch models, it's designed to be mounted on the back of your TV, approximately 5-10 centimetres in from the edge. I'm using mine with a 65-inch display and sure enough, it fit perfectly. Installation is very fuss free and it's thanks to the pared-back Philips Hue design I've come to expect.

There are several plastic mounting brackets included in the box with 3M adhesive strips on the back. Once you've stuck these in place, taking care not to block any vents or speakers, it's a simple matter to push the gradient lightstrip into position, starting from the middle which is marked with a tiny triangle.

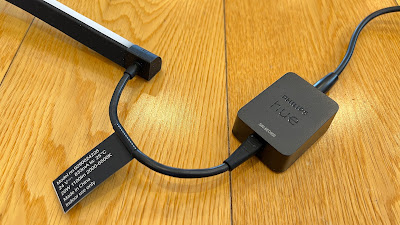
There's a small controller box that also sticks to the back of the TV. You plug the lightstrip in one end of this and the cable from the power adapter into the other. Assuming you can run that wire down the back of your TV stand, the whole setup should be totally invisible from the front.

Then it's just a matter of adding the strip to your Philips Hue profile via the app.

Oh yes, I should probably mention you're going to need some extra gear to do that. And this is the major catch when it comes to the Hue ecosystem. To make any Hue lights work you'll need a Hue Bridge. (NZ$109.00) This is a little white box that connects your lights to your Wi-Fi. Why?

Well, there is actually a solid rationale. Do you want every light in your house connecting to the same router as your phone, laptop and TV? Or would you prefer just one device that controls them all? That's the point of a bridge like this.

But wait, unfortunately there's more; for a product like the gradient lightstrip to do what it's designed to - ie; mirror the colours on your screen on the wall behind it - you need a way to tell it what's showing on that screen and where. That's where the Hue Play HDMI Sync Box comes in. (NZ$599.00)

Instead of plugging your external devices like gaming consoles, streaming sticks and set-top boxes directly into your TV, you plug them into one of the four HDMI ports on the Sync Box instead. You then plug the Sync Box into your TV (or monitor) enabling the video signal to pass through on its way to the screen.

The good news is this is actually a pretty tidy way to free up HDMI ports on your TV, you'll now only need one where you may have required up to four before.

The bad news is to make your NZ$399.95 Hue Play gradient lightstrip work, you'll need that extra $708.00-worth of gear... assuming you don't already have it.

How does this make sense? Perhaps only if you make use of other compatible products at the same time - devices like the Hue Play light bar and White and Colour smart bulbs can be added to your Sync Box setup to further enhance your off-screen lighting experience. In essence, the more Hue devices you add, the more your Sync Box justifies its expense.

But do you really need any of it?

Of course not. Why on earth would you need to shine pretty lights on the wall behind a TV that's already doing some reasonably interesting stuff? Except... you don't really need the TV either, right?

On the other hand, if you've decided you do need a TV and what's more, you've splashed out on a nice big one with narrow bezels around the edge, you may as well go all the way and extend your viewing experience beyond the screen itself. This is what the Hue Play gradient lightstrip achieves admirably - with just a few minutes installation and setup.

Using the Hue Sync app, you can adjust the brightness and intensity of your lightstrip, setting it to turn on automatically when any of the connected source devices are powered up and you can even link to Alexa or Google Assistant for voice control.

I was actually pretty impressed with the result. The gradient lightstrip does a seamless job of matching the predominant colours on screen, no matter what those colours might be.

Although you might think this is some kind of sensory overload to make the most of full-on gaming sessions and action sequences in superhero movies, I've found a couple of other scenarios where the lightstrip proved its worth just as effectively.

Visually, dramas can be pretty boring. Oh sure, a good director can find unusual angles and call on filters and other effects to add to the mood but generally you're just watching two people talking. However, add a bit of Philips Hue Play into the mix and suddenly the director's tricks are brought further to life. A classic case in point is the recent (and final) season of Ozark. I've always considered the technical production on this programme to be exemplary, particularly the sound mixing. However, it was only once I started watching it with the Hue gradient lightstrip I realised how the entire show is shot exclusively in shades of blues and greens, presumably in homage to the water and tree-filled landscape on display. Very cool.

The other surprise came when I was watching the Highlanders trounce the Western Force the other night, a game made even more enjoyable by the extension of the pitch projected all over my wall - or at least that's how it seemed. When there were close-ups, the amplified colours of the players' jerseys created the impression they were in the room with you. I found it all extremely immersive - almost as though I'd been magically transported down to Forsyth Barr Stadium.

Interestingly, Philips has decided you don't need any lightstrip along the bottom of your TV - it's only long enough for the top and the sides. In the case of those of us using a soundbar, this is probably fair enough as the base of our screens is pretty much obscured. On the other hand, modern stands are generally pretty slim and often leave a visible gap below most of the TV.

Luckily for me, I have a couple of Philips Hue Play light bars, long narrow lights that work in a similar way to the lightstrip. These can be mounted sideways and added to the Hue Sync app as part of your setup. I've positioned them on my TV cabinet behind the soundbar where they're out of sight yet still manage to complete the overall, all-round syncing effect.

See? Completely unnecessary but quite fun.

If you're an avid gamer, I have no doubt you'd find the effect this kind of setup can create to be satisfyingly immersive.

Apart from the price, the only other drawback of this lighting system is the fact it relies on source video from external devices - there's no way to mirror content from apps and streaming services installed directly on your TV. It's for this reason I've resorted to using Netflix and SkyGo on my phone instead, streaming through the Sync Box via a Google Chromecast. I wish there was a Hue app we could load onto our TV's to avoid this extra step.

Admittedly, Philips also makes Ambilight TV's with coloured LED's already built into the back panel to achieve a similar effect but that's not much help here.

The Hue gradient lightstrip is one of those tricky products I absolutely love but find hard to recommend because of the price - not just the price of the lightstrip itself but the other accessories required to make it all work. I can't fault the design, build quality, ease-of-use and reliability though. If this is something you've been considering and budget isn't an issue, I certainly won't stand in your way.


Click here for more information and pricing on the Philips Hue Play gradient lightstrip.


.

Tuesday, 10 May 2022

A Vacuum Worth Putting On Display

I'm starting to feel like I'm living through some kind of global vacuum cleaner renaissance. It seems there's a new and improved way to vacuum almost every week. 

While it's fun to let the robots take over - and who doesn't love a good selection of attachments - there still aren't too many vacuums out there people would be happy to... leave out there. You know; on show in the room with you, instead of locked away in a cupboard.

If you think I'm kidding, get a load of this...


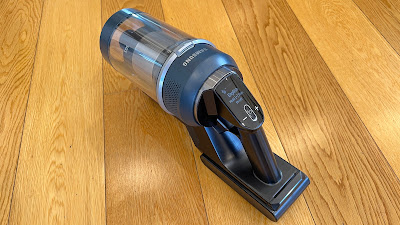
The Samsung Bespoke Jet Elite Extra is a long name for a vacuum but this is a cleaner with a lot going for it - starting with, yes, a look.

Samsung has a whole new range of "Bespoke" home appliances, which in most cases basically means cool colours, unusual finishes and unique design. For instance, the fridges now offer you a choice of "Cotta Metal" or "Glam Glass" in colours like Charcoal, White, Navy and Glam Pink. Stainless steel is so last decade apparently.

In the case of the Bespoke Jet Elite Extra stick vacuum, here in New Zealand your choice of colour is blue, blue or blue, no sign of the Misty White or Woody Green available in other regions. To be strictly accurate - neither the vacuum, its accessories or the Clean Station are totally blue - it's more of an accent colour combined with other elements of silver and dark grey. However, the overall design is inarguably pleasing to the eye - especially when the vacuum is docked in its station. This is due to the fact the Clean Station (which is also a charging station) is effectively just a tall cylinder suspended above a slightly wider base. When nestled in place, the Bespoke Jet itself is mostly obscured by the station so it doesn't really look much like a vacuum cleaner at all - more like some kind of high-end speaker or perhaps a crazy lamp.

And unlike most other stick vacuums, you won't lose any wall-space when you hang it up to charge - not much floor space either for that matter... well... there's a slight catch. The Bespoke Jet Elite Extra is both Elite and Extra because of the sheer number of accessories included in the box.

Perhaps the most important of those accessories is the Accessory Cradle itself. Not only does this store up to five separate attachments at once but it also charges a second battery. That requires a second power point and somewhere to put it all. Meanwhile, there's a carry-handle on top so you can unplug the whole cradle and bring all five accessories and the spare battery with you while you clean. Overkill? Perhaps, but then that's kind of what this vacuum is all about.

Let's get back to the Clean Station before we discuss the Bespoke Jet itself. As the name indicates, the Clean Station is not just a groovy way to store and charge your vacuum. Existing owners of the previous model Samsung Jet 90 pet stick vacuum will be aware of the optional Clean Station that can be bought to keep the emptying process totally touch-free. This stand-alone Clean Station works almost like a second vacuum cleaner, although you have to physically remove the dustbin from the Jet 90 pet then place it in the top of the Clean Station where it is sucked empty in a matter of seconds.

By combining the storage/charging dock with the Clean Station, the Bespoke Jet Elite Extra refines this process considerably. Now you can empty the vacuum any time you hang it up - much the same way a robot vacuum with an automatic-emptying station works. This all happens with the push of a button, sucking the contents of the dustbin down into the much larger, easily disposable bag in the Clean Station itself. Therefore you avoid the dusty, dirty process of emptying the bin into your rubbish yourself - although you will eventually have to give the dustbin and its filters a good rinse out at some stage.


In fact, the Bespoke Jet will let you know when that maintenance is required, via the clear and bright LCD display just above the handle. This is where you will usually see how much charge is left and what power setting you're using; Low, Mid, High or the intriguing Jet setting. This last is perhaps the strongest suction I've ever experienced from any kind of vacuum cleaner, making it a genuine effort to push the Bespoke Jet over carpeted surfaces. You certainly wouldn't want to vacuum the whole house at that level - you might suck yourself into another dimension. It also slays the battery life - you'll only get about eight minutes of Jet vacuuming versus twenty-four minutes when set to the default Mid which is perfectly sufficient for most areas and surfaces.

That said, as I've already noted, you do get an easily swapped-out extra battery in the box so available charge should never really be an issue.

Another fairly unique aspect of the Bespoke Jet is its extendible, telescopic pipe. Those old-fashioned vacuum cleaners like Mum had could sometimes be extended out for the comfort of taller users but for some reason, this just hasn't been an option on non-Samsung stick vacuums. I wish I could replace the Bespoke Jet back into its clean station while still telescoped out but unfortunately it only fits when fully retracted. Life is so hard sometimes, isn't it?

Right, let's run through these attachments; the motorised Jet Dual Brush combines a soft roller for hard floors with nylon and rubber bristles on the main brush that rotate at 4,000rpm. This seems to do a fine job on all my floor coverings - from wood to carpet to rugs - and I've been impressed with how little hair ends up wound around the main brush. It's also easy to take apart and reassemble if it does get clogged (you'll get a warning message on the LCD screen if this happens). There are two other brush heads - firstly the Slim Action Brush which only has a fluffy roller (with anti-static silver) specifically for hard floors. The joint assembly where this flatter head connects to the main tube is slightly more flexible so you can manoeuvre more effectively under furniture and into tight corners. Like the Jet Dual Brush though, it is still spring-loaded to present its attaching end up at a convenient angle. Don't you just hate bending down unnecessarily?

The other motorised brush head is the much smaller Pet Tool - ideal for duvets, furniture and car interiors.

In the box you'll also find the fairly standard Combination, extendible Crevice and Flexible tools, along with a couple of extra dust bags for the Clean Station.

Much less standard is the Spray Spinning Sweeper - another evolution of an optional accessory for the Jet 90 pet that's now included in that very big box. This head simply rotates your choice of two disposable wet cloths or reusable (and much better for the environment) anti-bacterial microfibre pads - at about 260rpm. There's no suction involved here - this is strictly a mopping operation only, albeit a pretty low-effort-required one. Especially given the option of spraying a little extra water on stubborn marks via the small Easy Clean Bottle inserted in the mopping head itself. The Bespoke Jet automatically changes to Wet mode when you attach the Spray Spinning Sweeper which means you can't suck but you can spray water by pushing the + button. This didn't actually work when I first tried it but by following the troubleshooting guide in the manual, I was able to purge the air in the line by operating the spray function without the water bottle in place. Everything functioned perfectly once I reinserted it. Does a great job too - those doggy paw prints are polished away in no time and the floor dries nice and quickly with no streaks.

In short, this is a hell of a package. Easily the best looking vacuum cleaner I've ever seen, perhaps the strongest suction I've ever experienced, with enough battery reserves to handle even very large homes. The Clean Station is literally a breath of fresh air and the selection of accessories included in the box is comprehensive to say the least; making mopping easy is a big tick in my book - especially with Winter and a wet dog on the way.

Not everybody would be prepared to shell out NZ$1799.00 for a vacuum cleaner but if it's in your budget, this one is about as feature-packed as it gets.


Click here for more information on the Samsung Bespoke Jet Elite Extra stick vacuum.

Sunday, 8 May 2022

Don't Waste a Single Ground

If you're anything like me, nothing happens till that first coffee of the day.

I don't mean that figuratively. I mean, I'm physically incapable of achieving anything useful until I'm fully caffeinated. Even talking in complete sentences. Just forming the words. Not an option.

Is that bad?

Probably. 

Am I an addict? Perhaps.

Regardless, I need that fix and I need it as quickly and as efficiently as possible. Yes, I much prefer fresh-ground, barista-poured but I also prefer no fussing about.

And the last thing I need first thing in the morning is a mess.


Breville has decided it's time I cleaned up my act, with the Barista Express Impress.

Before they added the "Impress" part of the title, the Barista Express has been one of New Zealand's most popular home espresso machines - if you don't own one I'd say you probably know somebody who does. It's compact, reliable, easy to use and maintain and it's a great one-stop-shop for grinding, extracting and steaming your own barista-style coffees.

I used a similar machine for many years with great satisfaction albeit with one minor drawback; to get enough ground coffee into the portafilter for "optimum extraction" meant filling it to overflowing, so you could then tamp the grounds down, achieving the ideal level of compaction for the right amount of pressure.

That not only meant the mess of spilt coffee grounds all over the machine and benchtop but wastage too. Sure, only a few pinches of coffee every cup but it all adds up over time.

Now Breville has definitely "Impressed" by adding an Assisted Tamping mechanism to their already wonderfully designed espresso machine. This means from the moment you insert the portafilter under the hopper, right through to tamping down the grounds, everything is completely self contained and there can be no spillage.

The whole process is very streamlined indeed - starting with Breville's Intelligent Dosing system which supposedly learns from every grind and tamp, even weighing the beans - to provide you with a consistent dose of ground coffee every time. This means you don't have to guess how much to grind yourself - the Express Impress does it for you. If that means one less thing I have to think about while still half-asleep, I'm for it.

Then the Assisted Tamping comes into play - while Breville's other espresso machines often feature a tamper tucked neatly away in a clever magnetic cavity for when you need it, the Express Impress has a lever on the side instead. Pull it down and the concealed tamping mechanism applies 10kg of pressure to your grind, every time. There's even an LED display to show you if you've ground the correct amount of coffee - if you haven't got quite enough in there, you can push the Dose button one more time for a little bit more. The green LED next to the smiley face symbol then lights up with a little beep and the Express Impress will remember that amount for next time.

Then it's a simple matter of transferring the portafilter over to the extractor and if you've got the dosage and tamping right, you'll see the pressure gauge swing into the "Espresso Range" while your coffee's pouring.

Of course, a major part of the equation is grind size too - the dial below the bean hopper offers a slightly-over-the-top twenty-five grind settings so you can fine-tune your shot depending on which bean you happen to be using.

I really have no idea what a Thermocoil Precision Heating System is but I can report the resulting espresso from the Express Impress always comes out nice and hot - never overheated or burnt-tasting.

My one drawback with this machine is when it comes to steaming the milk. I'm a latte guy usually (my god, that sounds so Aucklandy) so I'm definitely after some hot, smooth froth. While I've found the manual steam wand certainly does a great job of heating the milk, there seems to be a fine line between velvety foam and less desirable, soapsud-style bubbles. I'm sure this is more a testament to my personal inadequacies as a barista than an indictment on the Express Impress itself, although I've definitely used faster, more powerful steam wands with better results. (I must confess, I'm so lazy my preference is a machine with an automatic milk dispenser but that's a whole other category.)

The Barista Express Impress is not the first espresso machine I've used with a self-contained tamping setup like this but it might be the most refined. There's a bit of fiddling around with dosage and grind size when you first set it up but after that it's my ideal scenario; perfect coffee every time without having to think about it. You don't even have to pull very hard on the tamping lever, it's precisely engineered to apply all the pressure for you.

Lazy? Perhaps. Convenient? Definitely. Less mess? Absolutely. Thank goodness.

After all, if you can't be a little lazy first thing in the morning, when can you?