Thursday, 29 July 2021

Learning to Mac

This is going to be tricky to condense into a single article. Reviewing computers is always a bit of a challenge anyway - there's a lot you can do with a computer... as opposed to a smart light or a Wi-Fi extender for example.

So what about a computer that's different to any I've used before? Not just the way it looks but the way it works... even the keys do different things and are in different places.

I've been using this one for six weeks or so now and I still feel like a beginner, so you'll have to excuse me if you've heard some of these observations before. Remember; I'm an Apple newbie - you might be too and if that's the case, I hope you might find this helpful...


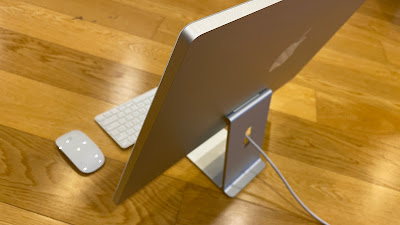
The iMac 24" I'm writing this with is, like most Apple products, a sheer triumph of beauty and aesthetic design. As usual, even just taking it out of the box is a sensory, tactile experience, bordering on erotic. By pushing down the sides of the box, the whole computer is levitated up towards you, like a magic trick. And when I say, "computer" of course, what I mean is Apple yet again resetting the standard in minimalism.

Because, just like the original iMac back in 1998, there is no visible computer to this computer - it's all screen. Of course, those 1998 models were notable not only for their range of bright colours but also the fact the whole computer was built into the screen itself - perhaps not all that miraculous given these were still CRT displays with plenty of room to bung in extra gear like hard drives and motherboards. Screen technology has evolved rather dramatically over the last 23 years, so while the principle is the same - the whole computer is built into the screen - that screen is flatter and slimmer than ever.

This means while this iMac is about the same same size as its 2019 predecessor, you now get a vastly improved 24-inch display instead of the previous 21.5-inches. It really is flat too - front and back - and only 11.5mm thin which is pretty crazy. In fact, when you make a Mac that thin, you create a few problems for yourself; most plugs are longer than that which means the headphone jack is now at the side and the power cable had to be completely redesigned to connect magnetically.

That cable is an attractive, heavy-duty, braided affair, coloured to match whichever of the seven choices you've decided on. Unfortunately, I didn't get to choose a colour (I would have gone with Pink - which is actually red and light red) but reviewers can't be choosers. It's also not just a power cable - not on this model, anyway. My iMac has an ethernet port on the external power brick so the connecting cable is a hybrid source of both power and internet.

There are three configurations available from the Apple store... the base model which has 256GB of storage, just two Thunderbolt USB 4 ports and is Wi-Fi-only ($2149.00)... the model I'm using, also 256GB but with two extra USB 3 ports, gigabit ethernet and Touch ID on its Magic Keyboard($2499.00)... or another $350 will get you the 512GB version. Each model features the same Apple M1 chip, 8GB of unified memory and that spectacular 24-inch, 4.5K Retina display, although the base model is slightly less powerful in terms of its discrete graphics capability and is only available in four colours, (blue, green, pink and silver) not all seven.

Whether your model has two or four USB ports, they're all situated at the back which is not actually particularly accessible - especially if you have accessories you need to plug in and out on a regular basis. The stand has a reasonable amount of tilt range, although you can't adjust the height. At least it comes fully assembled out of the box and has a convenient central cavity to help keep cables tidy.

Storage-wise - I'd argue the 512GB maximum is not enough for a modern computer - especially given the reason many people buy a Mac in the first place is to manage and edit photos and videos. Just as well external storage options are faster and more reliable than ever thanks to those Thunderbolt USB 4 ports, especially given there's no way to access the inside of the iMac to upgrade anything internally.

Some critics have commented on the iPad-like bezels and large chin - obviously most modern monitors are basically edgeless - but I can't say this worries me at all given how compact the the device is as a whole.

In fact, as computers go, I consider this year's iMac to be the most attractive desktop I've ever used. Between its slimness and small stand, it takes up hardly any surface space at all and the included wireless Magic Keyboard is also extremely compact, leaving plenty of room for mouse, trackpad, accessories, drinks and snacks.

I'm a bit fifty-fifty on that keyboard. The keys themselves a pretty nicely spaced-out and have surprisingly good travel, given how thin the keyboard is. However, I'd prefer the option to tilt the back of keyboard up as I find I'm used to a more ergonomic angle. Of course, my biggest gripe is getting used to the Control, Option and Command keys and what they do, as opposed to the ones I'm used to.

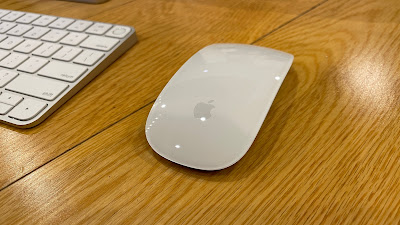
The same goes for the Magic Mouse - sure it's sleek and pretty but I don't think I'll ever understand Apple's reluctance to introduce a second button to right-click with. Given Macs are generally considered to be the be-all and end-all when it comes to video and audio editing, it's pretty hard yakka when you can't right click.

I was moaning about this some Mac-using friends of mine recently and they looked at me like I was an idiot. "Why don't you just plug in a different mouse?"

Excellent question. I'd been so determined to learn to do things the "Apple" way, I'd forgotten it's not actually compulsory. Obviously you can connect whatever mouse and keyboard you like.

(12/08/2021 - A week or so after writing this, I was doing a deep dive into the device settings and discovered you can in fact switch on right-click functionality for the Magic Mouse. Although... why this isn't set to "on" by default is kind of a mystery)

But that hasn't been my only pain-point on the MacOS learning curve. Just navigating my way around the iMac has been challenging for me. I get the impression Apple doesn't want you poking around amongst things like system files and advanced configuration settings - it's taken me several weeks to get the hang of finding and moving files for instance. In fact, for quite a while I thought moving files from one location to another was impossible as I could only Copy files, not Cut them. I then discovered a keyboard shortcut to do this but seriously, why do these things have to be so hard?

Also, who's idea was it to make lists appear from the bottom up? Perhaps that makes sense to whomever designed the Mac Downloads folder but I'm used to doing things another way.

Of course, these are just the grumblings of a cantankerous old geezer, stuck in his ways and struggling to learn a new system - a system that definitely has just as many advantages.

There's no denying this is a computer that works quickly, smoothly and efficiently, straight out of the box. Like any other Apple product, it's very hard to make this thing do something it's not comfortable with and as a result, it keeps humming along without a hitch. I could do a deep dive listing off processing speeds, graphics capabilities and the like but you can read all about that on the spec sheet if you want. In real terms, when it comes to doing all the things you need a family computer to do, the 24-inch iMac delivers everywhere.

As already discussed, the display is outstanding; sharp, clear with true-to-life tones and a decent anti-reflective surface if you have a window behind you like I do. Combined with an impressive, distortion-free, six-speaker sound system, it's actually a great device for watching movies or streaming TV on. In fact, bass response and dynamic range is well above the norm for desktop speakers so your favourite playlist will sound pretty good while you work.

I'm also impressed with the 1080p FaceTime HD camera - once again, a significant cut above the mediocre shooters built into most laptops and tablets.

And of course, this is the big advantage of choosing an iMac - things like speakers and cameras are built in - not optional extras - and they just work.

Perhaps the feature I've enjoyed most so far is the integration of other Apple devices. For example; you can unlock the iMac with your Apple Watch - saving you manually entering a password. If you have an Apple HomePod mini speaker or two scattered around the house, you can easily stream audio from your iMac or AirPlay video to a compatible TV. But the most useful integration of all has been having my phone notifications appear on screen and being able to AirDrop files between iPhone and iMac so seamlessly.

I was also very impressed with the iMac's microphone array the other night - not just for video calling but again, in conjunction with my iPhone. If you've ever spent too much time on hold with a call centre, you'll appreciate how easy it was for me to simply switch the audio from my phone to the iMac while I carried on working. Then, once I was finally taken off hold, I was able to talk via the computer with the person on the other end none the wiser.

All of this integration happens pretty much automatically, as long as you're signed in with the same Apple ID. Oh... were you wondering if you can do the same with non-Apple devices? Ummm... I'm guessing, not easily.

But that's no surprise - historically Apple hasn't "played well with others"... although I get the feeling that's starting to change. Connecting to printers seems to be easier than ever these days and Apple TV has started appearing on a heck of a lot of non-Apple devices. What's more, you can use Siri on the iMac as a kind of smart home hub, controlling any HomeKit-enabled devices you've set up around the house.

In short, although I've had to do a crash course in the operating system and some of the keyboard shortcuts, I have no reservations in recommending the 24-Inch iMac as a great, all-round family computing solution. It's not the cheapest option although I actually think it's pretty fairly priced for the specs and features it offers. It's fast and powerful, it looks incredible, the multi-media experience is first rate and it takes up very little space on your desk. If you're already using other Apple devices, it's really a bit of a no-brainer.


Click here for more information and pricing on the iMac 24".

Wednesday, 14 July 2021

Do I Need It? Can I Get It? How Much Does It Cost?

Lately, you may have noticed some publicity around something called, "Hyperfibre."

As the name suggests, albeit somewhat euphemistically, this is a really fast internet connection. I suppose they had to go with an adjective even more impressive than, "Ultra." I can't wait for BFB. (Bodaciously Fast Broadband)

When I heard Orcon touting its new Hyperfibre plans - including both 4GB and yes, now even 8GB options, I thought it only fitting to follow my role as your trusty tech guide and see if I could have it installed at my place so I could give it a good thrashing. 


Chorus has an online tool that lets you type in your address to find out if your local fibre exchange is zoopy-doopy enough to cope with the awesome power Hyperfibre promises.

I was surprised to discover yes, I could actually get Hyperfibre in my area. While I'm not exactly rural, Silverdale is only just a part of Auckland - in fact, once it wasn't... prior to Auckland declaring itself a SuperCity just a decade back. Not so long ago Auckland used to be a toll call away. I'm not even joking.

That was when we still had landlines of course. How early-2000's. Quaint.

Anyway, the point is; now I knew I could get it, there was no turning back. So it was bye-bye old ISP and hello Orcon... after a bit of a wait.

Turns out, although the Chorus availability tool assured me I could access up to 4GB Hyperfibre, when I actually started the ball rolling I received an email telling me there was "Build work required." I had no idea what that meant but the email said it might be something like getting the connection from the street to my house and it could take anything from a few days to "a couple of weeks."

I signed up June 4, finally got connected June 23. I hate to split hairs but that's longer than two weeks. Also, this is the internet. Why isn't it instant? 

Man I sound like a grumpy, old, complaining geezer. But wait, there's more...

On the day of installation, a guy from Chorus turned up with a new modem. This was a surprise - not him turning up, he'd contacted me to arrange a time - the surprise was my rather flash and quite new modem/router would not be up to the task of wrangling this golden new era of tsunami-like connectivity. It was duly unplugged and replaced with a much more boring looking Nokia device - but one with a very exciting new ethernet port.

Okay, this photo doesn't really do it justice but if you look carefully you'll see there's a 10GB socket, alongside the four other more conventional gigabit ones. This offers the potential to access those raw Hyper-speeds without having them choked by the very hardware that's bringing them into my home in the first place.

And this is, as always, the single biggest stumbling block for anyone considering a faster broadband upgrade; do you have the hardware to support it?

As I've often discussed when reviewing home networking devices, you can pay for all the download speed in the world but if you aren't running decent gear to distribute that connectivity around the house, you're not going to notice much difference... well... sort of.

Oddly, once the man from Chorus went away, I had to wait a couple of hours for my Orcon connection to kick in - again, I have no idea why this doesn't happen instantly but then, I'm no telecommunications engineer.


Of course, the second I was back online, I was running speed tests on every device in the house. It was pretty exciting, given I'd previously been on a 100/20Mps plan. (100Mps down, 20Mps up) These results are from my iMac, hardwired directly into the main router. I was floored to see my new speed of almost 1Gbps - both up and down.

Then I thought... hang on... I don't want to sound ungrateful but I'm supposed to be getting four gig - what's happened to the other three?

Don't get me wrong - the new connection has been a revolution in the glennzb household. Although no devices were connecting faster than a Gig, when you have all that bandwidth to play with, that means a you can play with all your devices at once, no problem at all. It no longer matters if one person is online-gaming, while another is streaming a movie, while another is uploading a presentation while another is watching a recipe on a smart display in the kitchen - there's now more than enough internet to go around. I can't imagine what I'd do with eight-GB... start my own online movie production business from home maybe?

Even via Wi-Fi, my phone was showing speeds in excess of 300Mps.

But the question remained; where were my other three Gigabytes?

And it's only today, as I finish writing this that I've finally figured it out. I'm fortunate to live in a house with data cabling wired throughout. I have ethernet access points in almost every room and as I've already mentioned, the modem/router I've been supplied can service five of those rooms directly but as it turns out, it's probably the cabling itself that's causing the slight slowdown.

My cable is Cat5e - unfortunately now a few generations behind the latest standard and only capable of supporting up to 1Gbps - not quite like attaching a garden hose to a fire hydrant but almost. Something to bear in mind if you're considering launching yourself into a new, Hyperfibre way of doing things. And no, I'm not about to tear open my walls to upgrade those cables. Not yet anyway. Not when I'm more than satisfied with being able to access 1Gbps in several rooms at once. Not bad for $184.95 a month.

Hah... remember when buffering and dropouts were an issue? Nope, me either.


Click here for more information and pricing on Orcon Hyperfibre plans.

Tuesday, 13 July 2021

At Last We Get to Hear What the Fuss Is About

"Baby Plays Around" by Elvis Costello is one of my favourite songs of all time. The melody is hauntingly beautiful and the catch in Costello's voice captures the heartbreak of the story perfectly. But it's the production of the track that elevates it into my Top Five list. Not just the restraint of keeping the arrangement to just vocal, acoustic guitar and the faintest of organ pedals in the background but technically, everything sounds super clean and pure. It's pretty much perfect.

So you want to be careful how you handle a track like that.

Do you want to squash it down into a bluetooth stream so you can play it through some tiny earbuds? Or are you just going to fire it out of a single cheap, little speaker sitting on your side-cabinet?

Probably. Although, at least now you have another choice...


Launched way back in November last year, the Apple HomePod mini is finally widely available here in New Zealand at several leading retailers and online from the New Zealand Apple Store.

While I had no doubt this would be a quality product - in my experience Apple only produces quality products - I was certainly skeptical about how good the HomePod mini could really be. Or rather, would it bring anything to the smart speaker game we haven't already seen from other manufacturers?

From the outset, I was pretty taken with its appearance. It really is extremely mini; I've seen bigger grapefruit. It won't look nearly as obvious as a grapefruit either - available in Space Grey or White, the HomePod mini is almost completely spherical and covered all over in a very friendly-feeling soft, fabric mesh. Well, almost all over - there's a small control panel on top which lights up in a very similar way to the Siri icon when you summon the virtual assistant on any other Apple device, in a kind of multi-coloured swirl. When the speaker is just playing audio, the control panel remains a dull white - not too intrusive, just enough to let you know it's doing something.

The controls are sparse; the ubiquitous plus and minus for volume, tap to play and pause, double-tap to skip, triple to go back and a long press to summon Siri. Of these few, I've only paused and adjusted the volume. After all, what's the point of having a smart speaker if you don't let it prove how smart it is? As it happens, this one's pretty damn smart.

Starting with the setup process... which isn't really much of a process at all. In fact, plug your HomePod mini in, give it a moment to power up and it'll appear on your iPad or iPhone automatically - walking you through a few (a very few) easy steps to complete the setup using the Apple Home app. If you've installed any HomeKit devices before, this will be pretty familiar. Really, it's pretty much just a matter of telling the speaker which Wi-Fi to connect to and which room it's in. If you have a second HomePod mini, you'll be instantly prompted to set it up as the other half of a stereo pair or as a standalone device in another room.

This literally takes seconds, perhaps the easiest setup of a device ever.

From that point, the seamless interconnectedness of your Apple account kicks in. Want to know what's in your calendar for the day? Ask Siri. Want to read out your latest text or call one of your contacts? Ask Siri. Want to control your HomeKit enabled devices like the latest range of Nanoleaf smart lighting solutions? Ask Siri. And of course, want to play some music, a podcast or even listen to some live radio? Ask Siri.

I know what you're thinking; up until that point, is there any difference between this smart speaker and any other? (Well, personally, I think it looks nicer - but that's just a taste thing)

From what I've experienced, there are two major differences. Firstly, the sound quality is actually hard to believe. As someone who spends hours every day in a radio studio, I'm kind of fussy about this stuff but the first time I heard what this tiny ball could do, I did a kind of aural double-take.

I don't understand how something so small can produce the "room filling sound" it claims to... but it really does. You can read all about the tech involved on the Apple website. I've even had people who work at Apple explain it to me. Yet, it still defies what I understand about speakers and audio and maybe even the way the world works altogether. I can get into the neodymium magnet that runs the driver, or Apple's S5 chip that controls the whole thing but who cares? You can look up all that stuff on the website. Take it from me, this speaker sounds... well... unbelievable.            

You know that favourite song of mine? "Baby Plays Around?" Scintillating. Exactly as warm and pure and clean as I wanted. Kanye's "Power" has a lot more going on; gang backing vocals, rock guitar riff, driving drum samples - the power is all there.

I like to give "Boom Boom Pow" by the Black Eyed Peas a run, just to see how thumping the bass response is and this is where things get really interesting. To be sure, there's only so much boom the HomePod mini's passive radiators can pow - remember; this thing is less than 10cm across. But there's no distortion at all - not even at 100%. By the way - that's how you need to tell Siri where you want the volume at; in percentages. This took me a minute to get used to - other speakers respond to a number on a scale of one to ten - not Siri. Not really a major, just a small quirk.

Which brings me to my other big point of difference; Siri is a better listener.

I get the feeling when it comes to virtual assistants, people generally don't rate Siri as highly as some of the others and I think I know why. It's both Apple's greatest strength and its greatest weakness; the infamous ecosystem.

What I haven't mentioned specifically yet is you will, of course, need another Apple device to set up the HomePod mini and an Apple ID to run it. And although you can use other streaming services to play your music and podcasts via AirPlay, everything works a lot better with an Apple Music subscription.

This also applies to things like voice recognition and the choices Siri the AI makes on your behalf. For example, you can simply ask Siri to, "Play something I'd like..." This is exactly the kind of intuitive behaviour we've always wanted from our virtual assistants - don't play the same stuff I always ask for, play something a bit like it instead. My favourite command? "Hey Siri... never play this song again." Come on - if that isn't enough reason to sign up for Apple Music, I don't know what is.

It's exactly these kind of "human-like" requests Siri seems to be able to carry out when the others either can't or won't.

What's more, the four internal mics do an incredible job of listening out for the "Hey Siri" command - again, better than any other speaker I've used. Siri rarely misses my requests, even when the volume is way up. (In the high percentages) Again, I'd go as far to rate Siri as the most responsive assistant I've used.

But as I say, voice recognition seems to be frustratingly limited to those in the house with an Apple ID. You can add up to six different users in your household. This means the HomePod mini will recognise each individual and will tailor its responses accordingly. After all, not everyone wants to dive down a Billie Eilish rabbit hole when they ask for, "Something I'd like."

On the other hand, the Domestic Manager (not an iPhone user) can't seem to get Siri to take any notice of her at all. Stop laughing. It's not funny. It's absolutely not funny.

In fact, it's so not funny, I've had to conceal my HomePod minis completely - something that's insanely easy to do given they take up virtually no space and the attractive, braided USB-C cable plugs into a compact 20W wall charger. (Yes, it's supplied in the box) Best of all, because of their incredible 360-degree performance, the HomePod minis still manage to provide the warm, room-filling ambience I'm looking for, even though one's up on top of the drinks cabinet and the other one is tucked away behind the telly.

Perhaps most remarkably of all, you can pick up a HomePod mini for just $159NZD - great buying for a device of this quality... if you're an Apple user. If not... have you thought about becoming one?


Click here for more information and pricing on the Apple HomePod mini.

Wednesday, 7 July 2021

The Ear Wear You Forget Is There

By now there can be no doubt Huawei has firmly established it self as a producer of quality personal audio devices. And it only took about five minutes. Okay - slight exaggeration but in just a few short years I've gone from never having heard of FreeBuds to considering them one of the most consistent lines of tech ever produced.

Guess what?

Nothing's changed.


Admittedly, the naming philosophy could do with a little work. I literally had to look up which model I'm reviewing before typing this sentence because I keep forgetting which one's which but today it's the FreeBuds 4. Not that complicated... except there's already been a Freebuds 4i, which is why I keep thinking I've written this review before.

The major difference is the form factor; these FreeBuds are the open-fit kind - they're designed to rest comfortably in your ears rather than squash right into your ear canals creating a hermetic seal. This kind of fit has its pros and cons... there's no question its more comfortable but it's difficult to be confident the buds won't just bobble out with a bit of rigorous activity.

There's a particular look to this style of ear bud too; you need to accept there are going to be a couple of obvious stems hanging down out of your ears, although with this generation Huawei has introduced a new colour other than boring old white; Silver Frost. This might not be everyone's cup of tea but I really dig the way it looks chrome - except without the fingerprints.

They're easily the lightest true-wireless buds I've tried - even the circular charging case is slim and featherweight - you'll have no issues slipping this sensuously curved disc into even the tightest pants pocket.

Because of that lightness and the open-fit, I'd be hard-pushed to come up with a more comfortable pair of earbuds either and this might be the feature that sets the FreeBuds 4 apart more than any other. I personally know several people who hate wearing earbuds of any kind simply because they just don't like putting things in their ears. If you are one of those people, I'd suggest you give these buds a go. I'm not exaggerating when I say they're so well balanced and light it's easy to forget you have them in - especially if you have your music on pause, obviously.

This is thanks to a heck of a lot of R & D on Huawei's part. They reckon they went through over 10,000 3D models to try and ensure a universal fit that wouldn't place any undue stress on any of the eight bits of your ear they've identified as being the most important bits. Whatever they did, it worked. You can wear the FreeBuds 4 for hours with no fatigue or discomfort whatsoever.

Unfortunately, perhaps in an effort to keep things slim and light, battery life is far from market leading. Huawei only claims up to 2.5 hours of playback with ANC enabled - enough for a commute but perhaps not a commuter flight. Conversely, there's plenty of charge in the case - enough for 14 hours with ANC on and 22 without. So for someone like me, who only tends to use my earbuds for an hour or two at a time before popping them back in the case, I've only ended up charging the case about once a fortnight.

Oh... so you noticed I mentioned ANC? Yes, despite the open fit, Huawei have attempted to introduce some pretty advanced Active Noise Cancelling tech into the equation. There's a limit to how much you can do here - as I've pointed out before, if you're not physically keeping ambient noise out with a tight seal, there's only ever going to be so much you can do to combat it electronically. And yet... as I sit here typing this with some power pop (courtesy of Kelly Clarkson's "Heat") pumping through the FreeBuds 4, I can't actually hear myself tap-tapping the keyboard. This bodes well if you're considering using these in an office environment.

Look, the ANC isn't perfect and for more sparse, acoustic tracks or when listening to spoken podcasts, you'll definitely still hear most of what's going on around you but for more persistent droning sounds - train, traffic, aircon, background conversation - a lot of it definitely stays way in the background and won't interfere with you enjoying your latest release at all. I'm quite impressed.

As I am by the sound quality generally. The Huawei design team went back to the drawing board for the FreeBuds 4 and came up with a new LCP polymer for the 14.3mm driver. It's lighter (like everything about these buds) and more flexible, this means better frequency response and less likelihood of distortion. There's also an ingenious bass tube design which manages to achieve a level of bass response I've previously only experienced with sealed-fit earbuds, never with an open-fit design like this. On a track like "Boom Boom Pow" by the Black Eyed Peas, you can actually feel that bass pressure. Pretty cool.

Huawei's AI Life companion app is a good news / bad news story. The FreeBuds 4 are capable of a lot of clever tricks - especially when it comes to proximity pairing. Unfortunately, these automatic pop-up windows will only appear on late-model Huawei devices, most of which aren't widely available in New Zealand. However, that's only a small downside because the FreeBuds 4 are actually pretty much as easy to pair as any other bluetooth device. What's more, you can pair them to two things simultaneously - so I can use them for my phone and my TV without having to re-pair to each one every time. Not that I'd recommend the FreeBuds 4 for TV use; there's a definite lag with the audio. Again, this is something you can eliminate when gaming - but only when paired to the right Huawei OS 2 device.

Don't worry, it's mostly good news though. The AI Life app lets you customise the on-board controls and yes, things like swiping the stem to adjust the volume work very well. You can choose your virtual assistant too; I'm currently paired with an iPhone and Siri responds straight away without me having to touch a thing.

The FreeBuds 4 are also IPX4 rated against dust and water - this means exercise is certainly an option. But again, what about that open-fit? Don't they just wobble out after a few hard steps? Well, I've taken them running and with my style, all my steps are hard. Just like the rest of the time, not only did my embattled, 5km slog not dislodge either bud in the slightest, again I hardly even noticed I was wearing them.

Yes, these are definitely the true-wireless earbuds for people who hate wearing earbuds and although they're not quite on sale in New Zealand yet, judging by what other markets are charging for them, the FreeBuds 4 look like they'll be extremely good value for money.


Click here for more information on the Huawei FreeBuds 4.

Monday, 5 July 2021

The Next Cool Thing You Definitely Don't Need

How's your smart lighting game? 

We've quickly reached the point where the options have become literally limitless. You can now light any area of your home any colour you like at any brightness. You can light different rooms and spaces different colours. You can schedule all those lights to do all those things at a time of your choosing. You can even create lighting routines that launch automatically based on things like when you walk in the room or when you leave the house.

Pretty crazy.

So you may as well have some lights that don't even look like lights...


If you've read any of my reviews about other Nanoleaf lighting products, you'll know they're capable of all that smart stuff I just mentioned and even more.

However, up until now, they haven't exactly been designed to coordinate with your decor. In fact, the shapes, hexagons and triangles I've tried are more like something off the set of Star Trek - starkly white when not in use and often prompting visitors to ask something like, "What the hell is that?"

The Elements Wood Look Hexagons tone things down a little.

As the name clearly describes, while these particular Nanoleaf Elements are the same size and shape as the original hexagons, they now sport a tasteful, woodgrain veneer - similar in tone to that found on a lot of office furniture.

That tone changes, of course, the moment you assemble your hexagons and power them up. This is done using the supplied snap-in connectors. Again, unlike the original white ones, these are a kind of burnt yellow, as is the rear plastic of the light panels themselves.

I won't go into too many details regarding setup and installation, as this process is pretty much identical to what I've outlined in my previous reviews. However, I will point out this time round I used Apple's Home app to initialise my Hexagons and it was probably my smoothest setup yet - even more efficient than using the Nanoleaf app itself. Using these shapes as a HomeKit device, you can sync your settings between the two apps and from that point, the Hexagons can be controlled from any Apple device on your network - including the recently launched HomePod mini smart speaker. Yes, you can turn them on and off, change the brightness and select your favourite scenes just by asking Siri to do it for you.

Of course, Google Assistant and Amazon Alexa can talk to the Hexagons too but as a recent (and very late) Apple adopter, what I'm quickly learning is a lot of things were designed to work with the Apple ecosystem first, then ported across to the rest later. This tends to mean a far more streamlined and efficient experience.

The other advantage of using the Wood Look Hexagons in conjunction with one or more HomePod minis, is they're both Thread enabled. This is a new kind of low-energy wireless networking technology that gets stronger and more efficient the more devices you add to it, helping to ensure commands are carried out reliably and most importantly, with no delay.

The mounting system has remained unchanged from the last Nanoleaf light panels I tried - a combination of double-sided adhesive pads attached to a central, click-on mounting plate for each panel. I've found this to be easy to do and very secure - although you might want to think long and hard about sticking these things onto wallpaper. In my experience, the adhesive mounting strips supplied, while theoretically removable, won't give up without a fight and I now have a couple of suspicious-looking bulges on my wall where the wallpaper got a little stretched when I took some panels down. (Don't tell the boss. Maybe she won't notice)

Or, if you're really sure of yourself, you can just screw them on instead. Using the Nanoleaf app, you can put your design up on the wall virtually, so who knows - maybe you will be brave enough to get the drill out after all?

But back to what makes these particular panels unique; their woodness. Now, make no mistake; they're not wood, they just look a bit like it. I found it fun that there's an obvious grain showing so you can choose to match that across your whole design or take a more random approach.

Interestingly, there are no different colour options when using the Wood Look Hexagons - you can only adjust brightness and warmth. That being said, I've been surprised how much scope that still gives you when it comes to deciding on your preferences. I've installed my panels on the wall behind my desk and my favourite scene is a preset already available on the app which turns panels on, off and adjusts the brightness to provide a flickering fireside effect. This creates a surprisingly convincing illusion of cosiness - even though the panels don't put out any actual heat at all. It's pretty clever.

You can also use the Circadian setting to have the panels brighten and soften according to how much daylight is about.

The control panel comes in the same, wood-look finish and lets you perform a lot of the aforementioned functions manually. As mentioned in previous reviews, the panels themselves can also be set up as touch controllers - to be customised to your preference. Certain taps and swipes can power on or off, or change the brightness and scenes.

Some of this stuff is new, some not so much. One thing I was very pleased to note is these new panels light up almost right to the very corners (yes, all six of them) whereas previous Elements and Shapes had obvious dim crescents at every point, which always diluted the effect a little for me. This is a welcome enhancement, especially given most of the features I've outlined here I've seen before. The power cable is now a very classy, braided material - still white to stay relatively incognito on most modern walls.

The real question is, how much are you prepared to pay for something that serves no useful purpose whatsoever? Right now you can pre-order the Wood Look Smarter Kit for RRP $429.99NZD. I'm sorry... but that seems pretty steep for a box of nine lighting panels - no matter how smart they are. Unless... you consider them to be a work of art. Then it's all in the eye of the beholder, isn't it?


Click here for more information and pricing on the Nanoleaf Elements Wood Look Hexagons.